Codership, the makers of Galera Cluster, are pleased to announce the availability of Helm charts for Galera Cluster for MySQL 8.0.39. It is available on our GitHub releases page, for convenience. You are encouraged to send feature requests at our GitHub issues.
Helm charts help you manage your Kubernetes applications, to install and upgrade any Kubernetes applications; think of it as a package manager. Kubernetes helps you automate the deployment, management and scaling of containerized applications.
For this blog post, we will use the example of setting it up at DigitalOcean, but the setup is similar, whether you do this in a Kubernetes on-premises deployment or if you do it on another cloud provider (e.g. Amazon Elastic Kubernetes Service or Google Kubernetes Engine).
It would be a good idea to also have a Linux box to handle the management, and connectivity to your Kubernetes cluster. In this example, we use Ubuntu 24.04 LTS. We install:
snap install kubectl --classic
snap install helm --classic
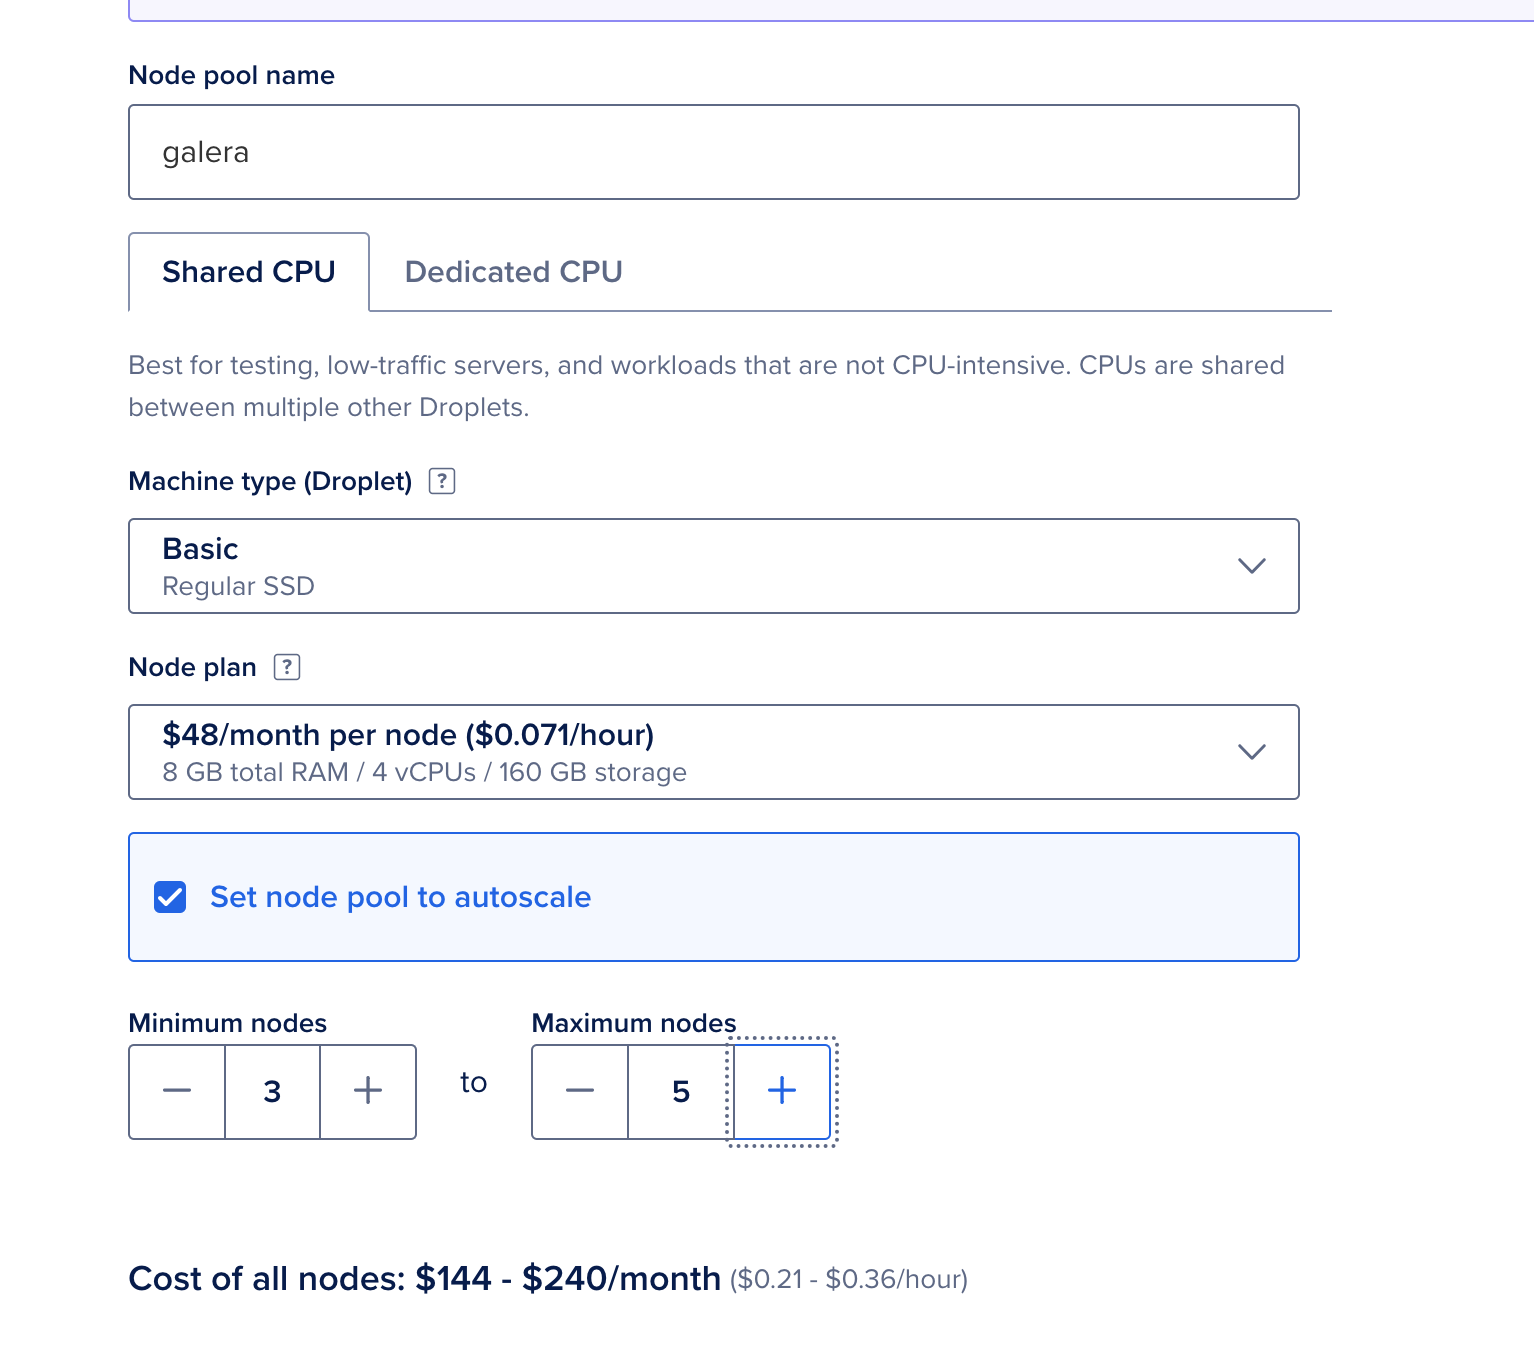
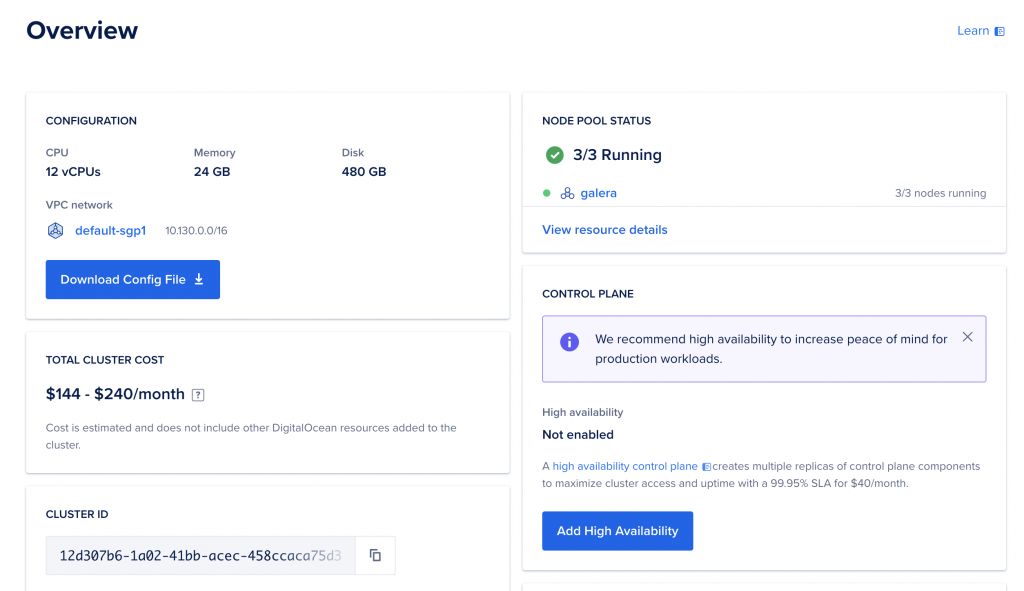
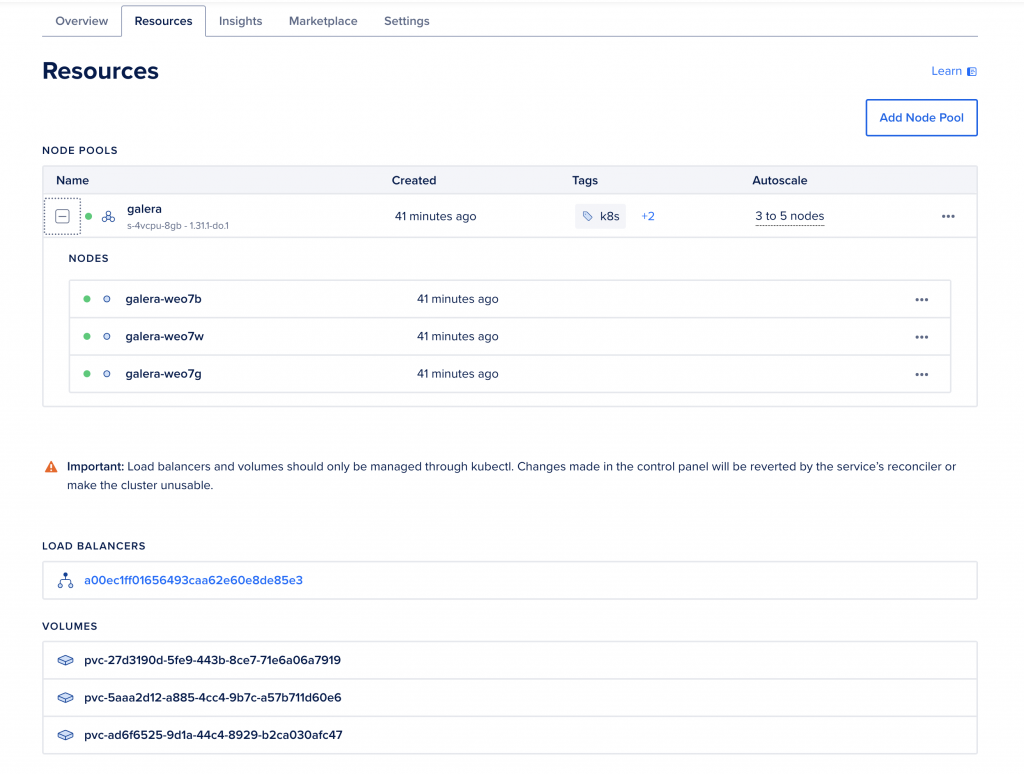
Then in the DigitalOcean control panel, we launch a 3-node Kubernetes cluster. You are advised to use an 8GB instance, because MySQL itself would like a good 4GB. Once setup, download the config file.
mkdir ~/kube
cp galera-kubeconfig.yaml ~/kube/config
chmod 0600 ~/kube/config
Now you can verify the connection by listing nodes in your cluster. The output should look similarly:
root@kube:~# kubectl get nodes
NAME           STATUS   ROLES    AGE     VERSION
galera-weo7b   Ready    <none>   6m29s   v1.31.1
galera-weo7g   Ready    <none>   6m41s   v1.31.1
galera-weo7w   Ready    <none>   6m48s   v1.31.1
Get the Galera Helm chart and get ready to deploy it:
wget https://github.com/codership/containers/releases/download/8.0.39/mysql-galera-8.0.39-1.tar.gz
tar -zxvpf mysql-galera-8.0.39-1.tar.gz
cd mysql-galera-8.0.39-1
root@kube:~/mysql-galera-8.0.39-1# kubectl create namespace galera

namespace/galera created
root@kube:~/mysql-galera-8.0.39-1# helm install galera-release . -n galera
NAME: galera-release
LAST DEPLOYED: Fri Oct  4 00:48:03 2024
NAMESPACE: galera
STATUS: deployed
REVISION: 1
NOTES:
NOTE: It may take a few minutes for the LoadBalancer IP to be available.
Before you deploy it, you can also edit values.yaml to at least change the rootpw:
mysql:
  rootpw: "@@SET_ME@@" # will be used only in the case of database initialization
  user:
    name: "@@SET_ME@@" # this account will be used for read-only liveness checks
    passwd: "@@SET_ME@@" # and a password for that account
If this is not changed, your default root password will be @@SET_ME@@ (not a bad password!). Now you can wait for the pods to be ready:
kubectl get pods -n galera -w


NAME                            READY   STATUS            RESTARTS   AGE
galera-release-mysql-galera-0   0/1     PodInitializing   0          19s
galera-release-mysql-galera-1   0/1     PodInitializing   0          19s
galera-release-mysql-galera-2   0/1     PodInitializing   0          19s
galera-release-mysql-galera-1   0/1     Running           0          31s
galera-release-mysql-galera-2   0/1     Running           0          35s
galera-release-mysql-galera-0   0/1     Running           0          37s
galera-release-mysql-galera-0   1/1     Running           0          62s
galera-release-mysql-galera-1   1/1     Running           0          83s
galera-release-mysql-galera-2   1/1     Running           0          91s
Check the status of pods in the Galera Cluster:
kubectl get pods -n galera
NAME                            READY   STATUS    RESTARTS   AGE
galera-release-mysql-galera-0   1/1     Running   0          2m46s
galera-release-mysql-galera-1   1/1     Running   0          2m46s
galera-release-mysql-galera-2   1/1     Running   0          2m46s
Now we can get the status of the Galera Cluster by executing:
kubectl exec -it galera-release-mysql-galera-0 -n galera -- mysql -uroot -p$(kubectl get secret --namespace galera galera-release-mysql-galera -o jsonpath="{.data.mysql-root-password}" | base64 --decode) -e "SHOW STATUS LIKE 'wsrep_cluster_size';"
Enter password:
+--------------------+-------+
| Variable_name      | Value |
+--------------------+-------+
| wsrep_cluster_size | 3     |
+--------------------+-------+
Note that you should replace galera-release-mysql-galera-0 with whatever podname you have created. If you wanted to login directly, you could also just do:
kubectl exec -it galera-release-mysql-galera-1 -n galera -- /bin/bash
mysql -uroot -p
And this will give you access to the MySQL instance running in the pod: galera-release-mysql-galera-1.
It is however better to use the load balancer provided by DigitalOcean, since you will have 1 IP to connect to, and it will balance between the 3 Galera Clusters on the backend (and in this particular example setup, we did say that the backends can grow till 5 nodes). While you can get the IP address from the DigitalOcean GUI, you can also do so from the command line:
kubectl get services -n galera

NAME                                 TYPE           CLUSTER-IP      EXTERNAL-IP      PORT(S)                      AGE
galera-release-mysql-galera          ClusterIP      None            <none>           4567/TCP,4568/TCP,4444/TCP   11m
galera-release-mysql-galera-client   LoadBalancer   10.245.90.155   188.166.205.11   3306:30006/TCP               11m
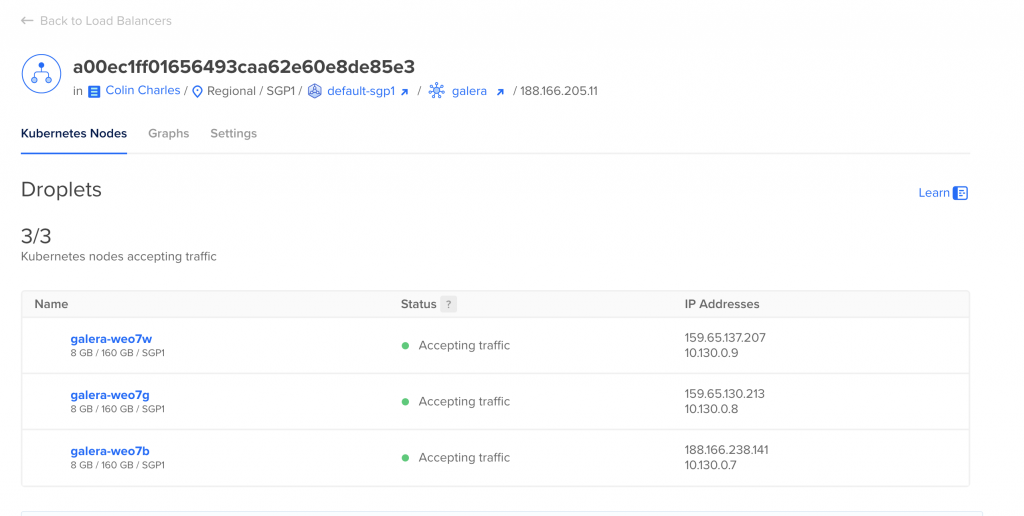
You will notice the load balancer IP in this example is 188.166.205.11. Now all you have to do is connect to it (mysql -h 188.166.205.11 -uroot -p, and see which node you end up getting (this can of course vary). Upon a few runs, here is an extract of what you may see:
mysql> select @@server_uuid,@@server_id,@@hostname\G
*************************** 1. row ***************************
@@server_uuid: 759c7a51-81ea-11ef-9b0f-9e9aad10fd60
  @@server_id: 1
   @@hostname: galera-release-mysql-galera-1
1 row in set (0.00 sec)

mysql> SHOW VARIABLES LIKE 'wsrep_node_name';
+-----------------+-------------------------------+
| Variable_name   | Value                         |
+-----------------+-------------------------------+
| wsrep_node_name | galera-release-mysql-galera-1 |
+-----------------+-------------------------------+
1 row in set (0.00 sec)

mysql> select @@server_uuid,@@server_id,@@hostname\G
*************************** 1. row ***************************
@@server_uuid: 6694e6f5-81ea-11ef-9303-e2481ce35a66
  @@server_id: 1
   @@hostname: galera-release-mysql-galera-0
1 row in set (0.01 sec)

mysql> SHOW VARIABLES LIKE 'wsrep_node_name';
+-----------------+-------------------------------+
| Variable_name   | Value                         |
+-----------------+-------------------------------+
| wsrep_node_name | galera-release-mysql-galera-0 |
+-----------------+-------------------------------+
1 row in set (0.02 sec)
An example of connecting to 2 pods is above: galera-release-mysql-galera-1 and galera-release-mysql-galera-0. In this blog, we did not even end up using doctl to configure DigitalOcean, but that is also an option, which you can use. It is simple via a snap install doctl and you may note that you will likely have to create a .config directory manually (there is a referenced bug).
Now you have a 3-node Galera Cluster running in a 3-node Kubernetes deployment. Happy Galera Clustering with Kubernetes.
Remember, we are still looking for feedback. Tell us what you want! And if you have further questions, do not hesitate to contact your friendly sales representative via email at sales@galeracluster.com or via the contact form.