It is with pleasure that we announce the latest release of Galera Manager can now manage your existing Galera Cluster installations as well. This works for base operating systems like CentOS 7, Ubuntu 18.04 and Ubuntu 20.04. It also supports MariaDB 10.3, MariaDB 10.4, and MySQL 5.7 and MySQL 8.0. Please also join us for our upcoming Webinar: Monitoring your existing MySQL and MariaDB Galera Cluster with Galera Manager to celebrate this release and help you go through what is now available.
Galera Manager provides charts for monitoring the host and database metrics, to ensure the proper and efficient functioning of your cluster. There are over 620 metrics to choose from. Galera Manager is fully web-based, and will work in any standard web browser to administer and monitor your clusters.
So first and foremost, you start with installing a Galera Cluster. We have plenty of documentation for this, but to make this tutorial complete, we will include the information here as well. Galera Manager requires SSH access to do installations, so do the following:
ssh-keygen -t rsa -C "byte@aeon.com.my"
Ensure that the id_rsa.pub is basically your ~/.ssh/authorized_keys file.
Launch your 3 hosts for a Galera Cluster, and in each make sure you install Galera Cluster for MySQL 8.
vi /etc/yum.repos.d/galera.repo

[galera4]

name = Galera

baseurl = https://releases.galeracluster.com/galera-4/centos/7/x86_64

gpgkey = https://releases.galeracluster.com/GPG-KEY-galeracluster.com

gpgcheck = 1
[mysql-wsrep8]
name = MySQL-wsrep
baseurl = https://releases.galeracluster.com/mysql-wsrep-8.0/centos/7/x86_64
gpgkey = https://releases.galeracluster.com/GPG-KEY-galeracluster.com
gpgcheck = 1
yum install -y galera-4 mysql-wsrep-8.0
You will want to disable SELinux on CentOS 7 (there is no firewall in a default install). You do this by executing setenforce 0.
[root@galera-3 ~]# sestatus

SELinux status:                 enabled

SELinuxfs mount:                /sys/fs/selinux

SELinux root directory:         /etc/selinux

Loaded policy name:             targeted

Current mode:                   enforcing

Mode from config file:          enforcing

Policy MLS status:              enabled

Policy deny_unknown status:     allowed

Max kernel policy version:      31

[root@galera-3 ~]# setenforce 0

[root@galera-3 ~]# sestatus

SELinux status:                 enabled

SELinuxfs mount:                /sys/fs/selinux

SELinux root directory:         /etc/selinux

Loaded policy name:             targeted

Current mode:                   permissive

Mode from config file:          enforcing

Policy MLS status:              enabled

Policy deny_unknown status:     allowed

Max kernel policy version:      31
You can then make a simple Galera Cluster by editing your /etc/my.cnf:
binlog_format=ROW

default-storage-engine=innodb

innodb_autoinc_lock_mode=2

bind-address=0.0.0.0
# Galera Provider Configuration
wsrep_on=ON
wsrep_provider=/usr/lib64/galera-4/libgalera_smm.so
# Galera Cluster Configuration
wsrep_cluster_name=”galera”
wsrep_cluster_address=”gcomm://188.166.183.98,188.166.183.120,188.166.242.246″
# Galera Synchronization Configuration
wsrep_sst_method=rsync
# Galera Node Configuration
wsrep_node_address=”188.166.183.98″
On node 1, execute:
mysqld_bootstrap --wsrep-new-cluster
With MySQL 8, you will need to change the password as well, because a temporary password is generated: grep 'temporary password' /var/log/mysqld.log and then login as mysql -uroot -p with the temporary password, and execute: ALTER USER 'root'@'localhost' IDENTIFIED BY 'MyNewPass1!';
On node 2, you can now execute: systemctl start mysqld
You can see the wsrep status by executing: SHOW STATUS LIKE ‘wsrep_cluster_size’;.
Now you can start node 3 the same way as above. Now you have a 3-node Galera Cluster, you can fire up another node for Galera Manager.
To install Galera Manager, on your new host, you do:
wget https://galeracluster.com/galera-manager/gm-installer
After that, you should make it executable, by executing: chmod +x gm-installer. Start the installer via: ./gm-installer install. Follow the instructions and you should have a GUI setup.

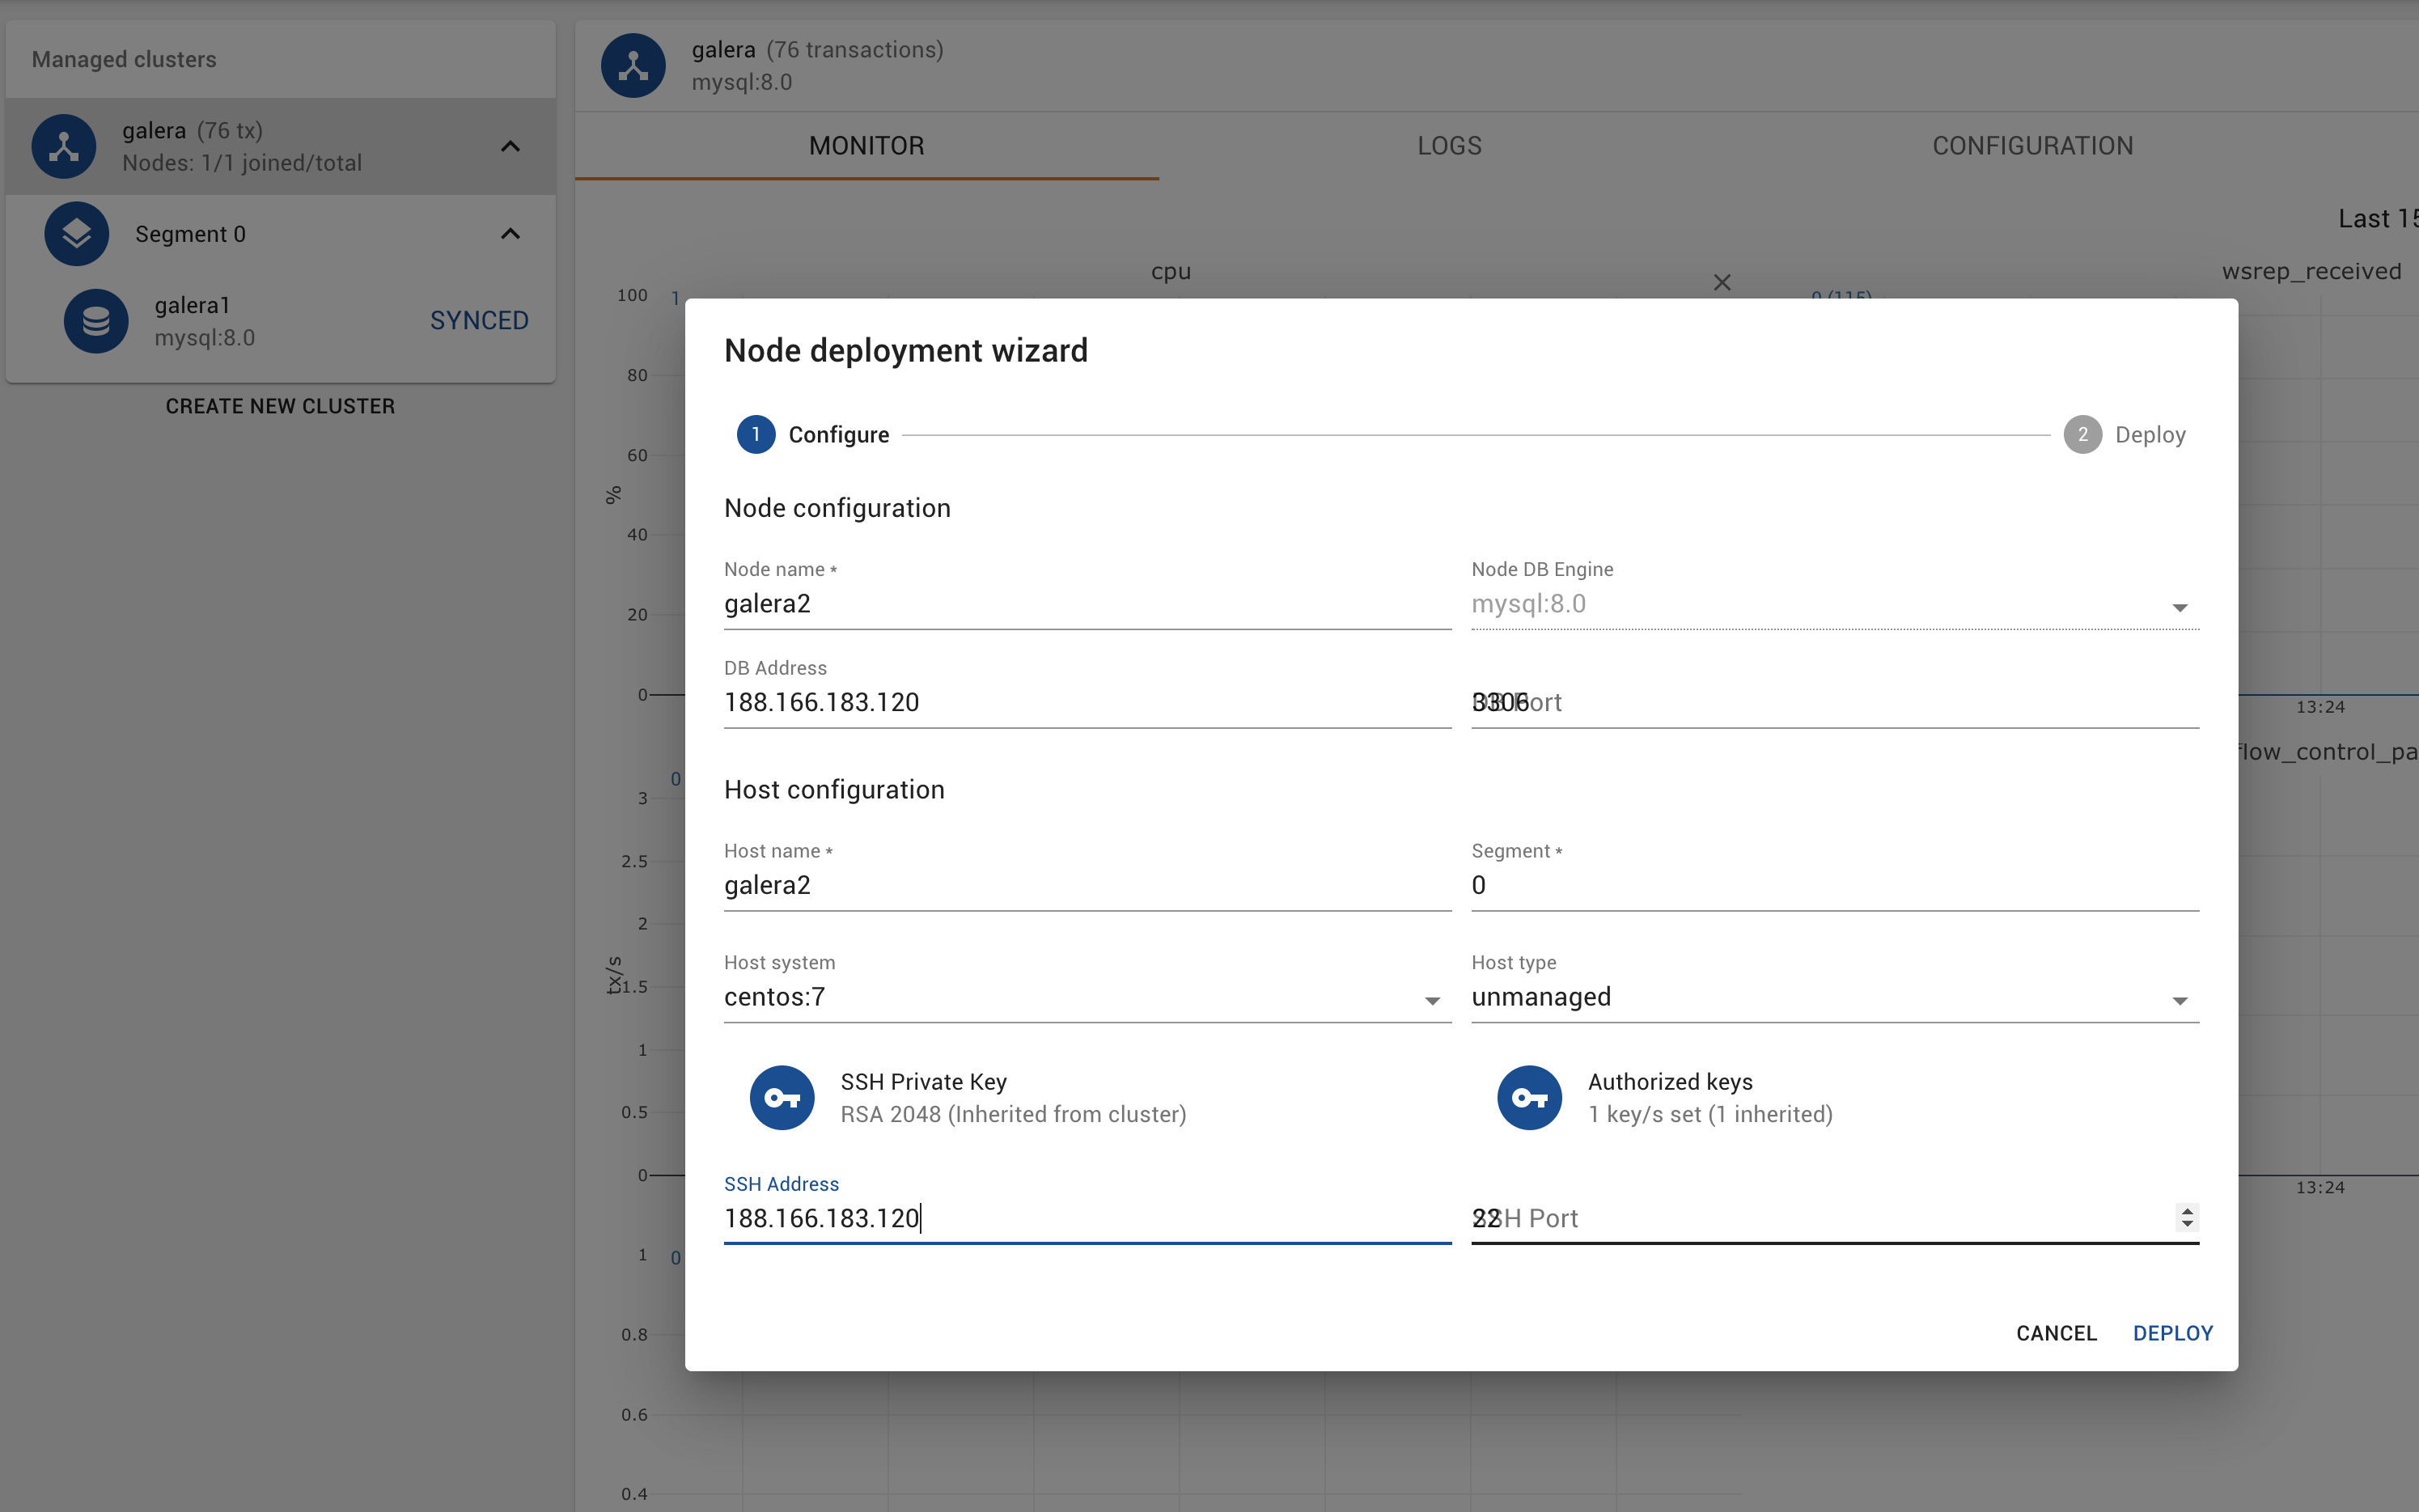
You will configure the cluster using the host type as “unmanaged” — there are ec2, locallxd and unmanaged as valid options. You will enter the SSH private key that was generated earlier, as well as the authorized_keys. Provide the database root password of what was setup previously.
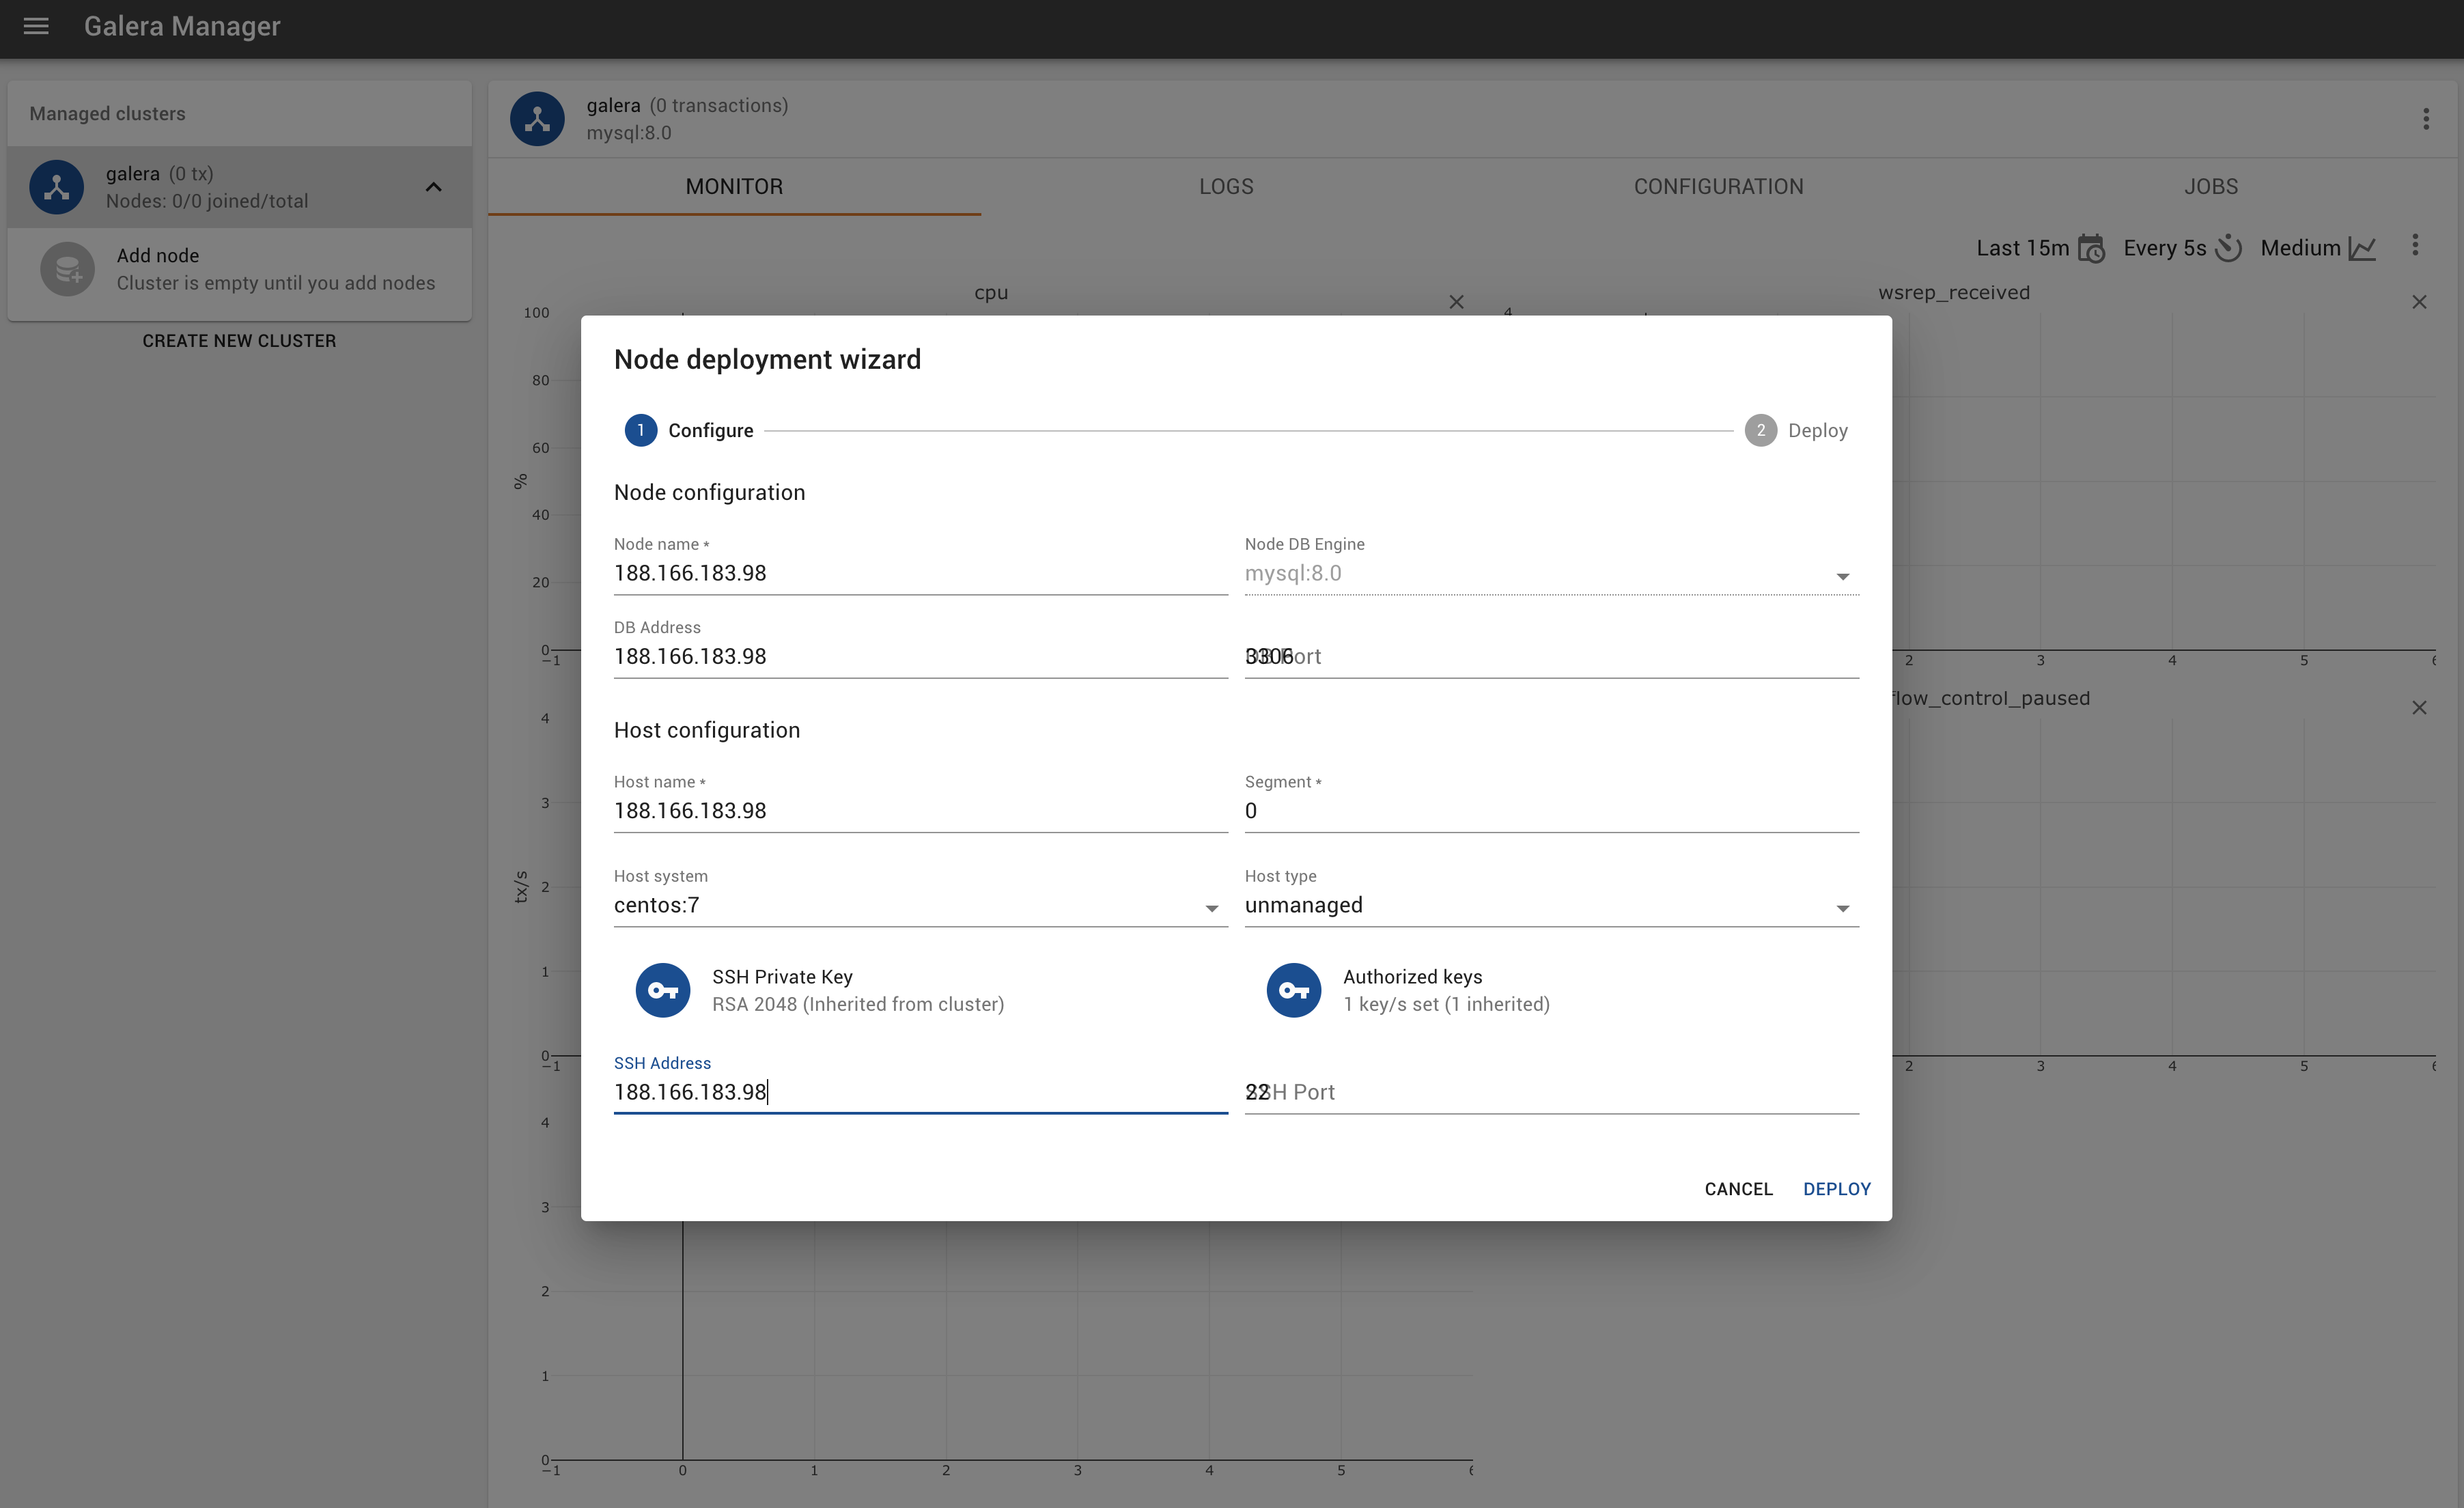
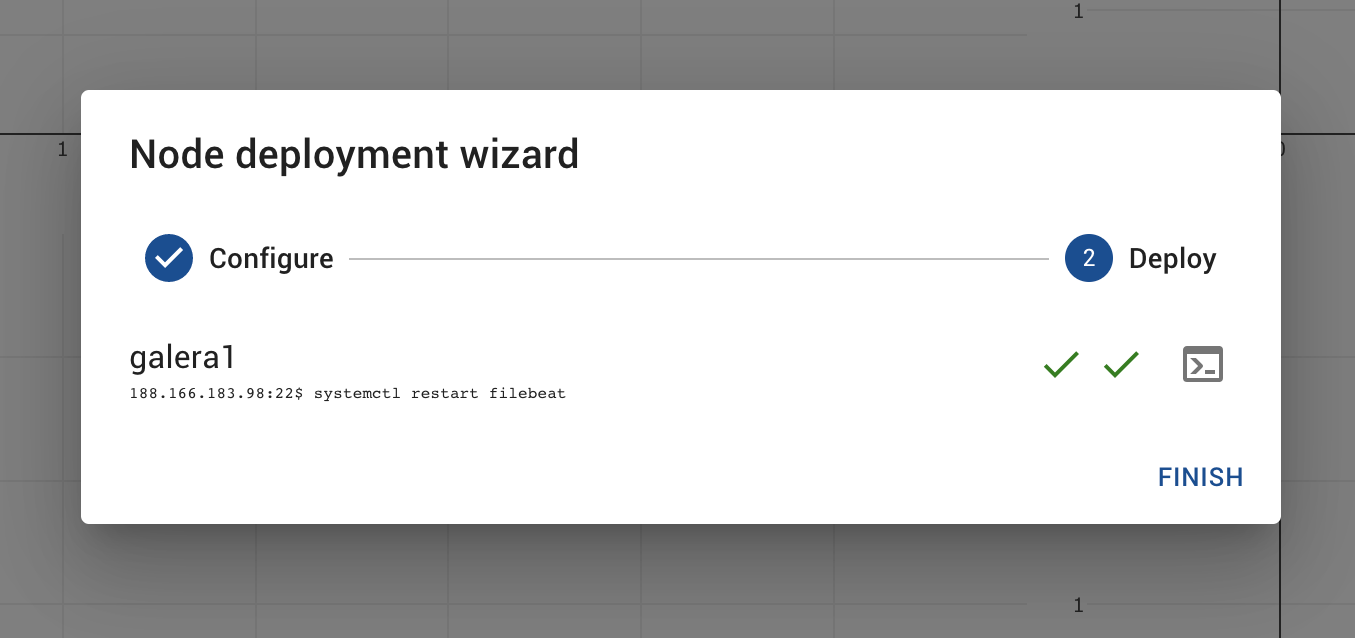
Now you can configure a node, giving the first node IP address. You should set the node name to galera1 not the IP address.
In the example below, we started inserting data into node 3, but only node 1 was being monitored.
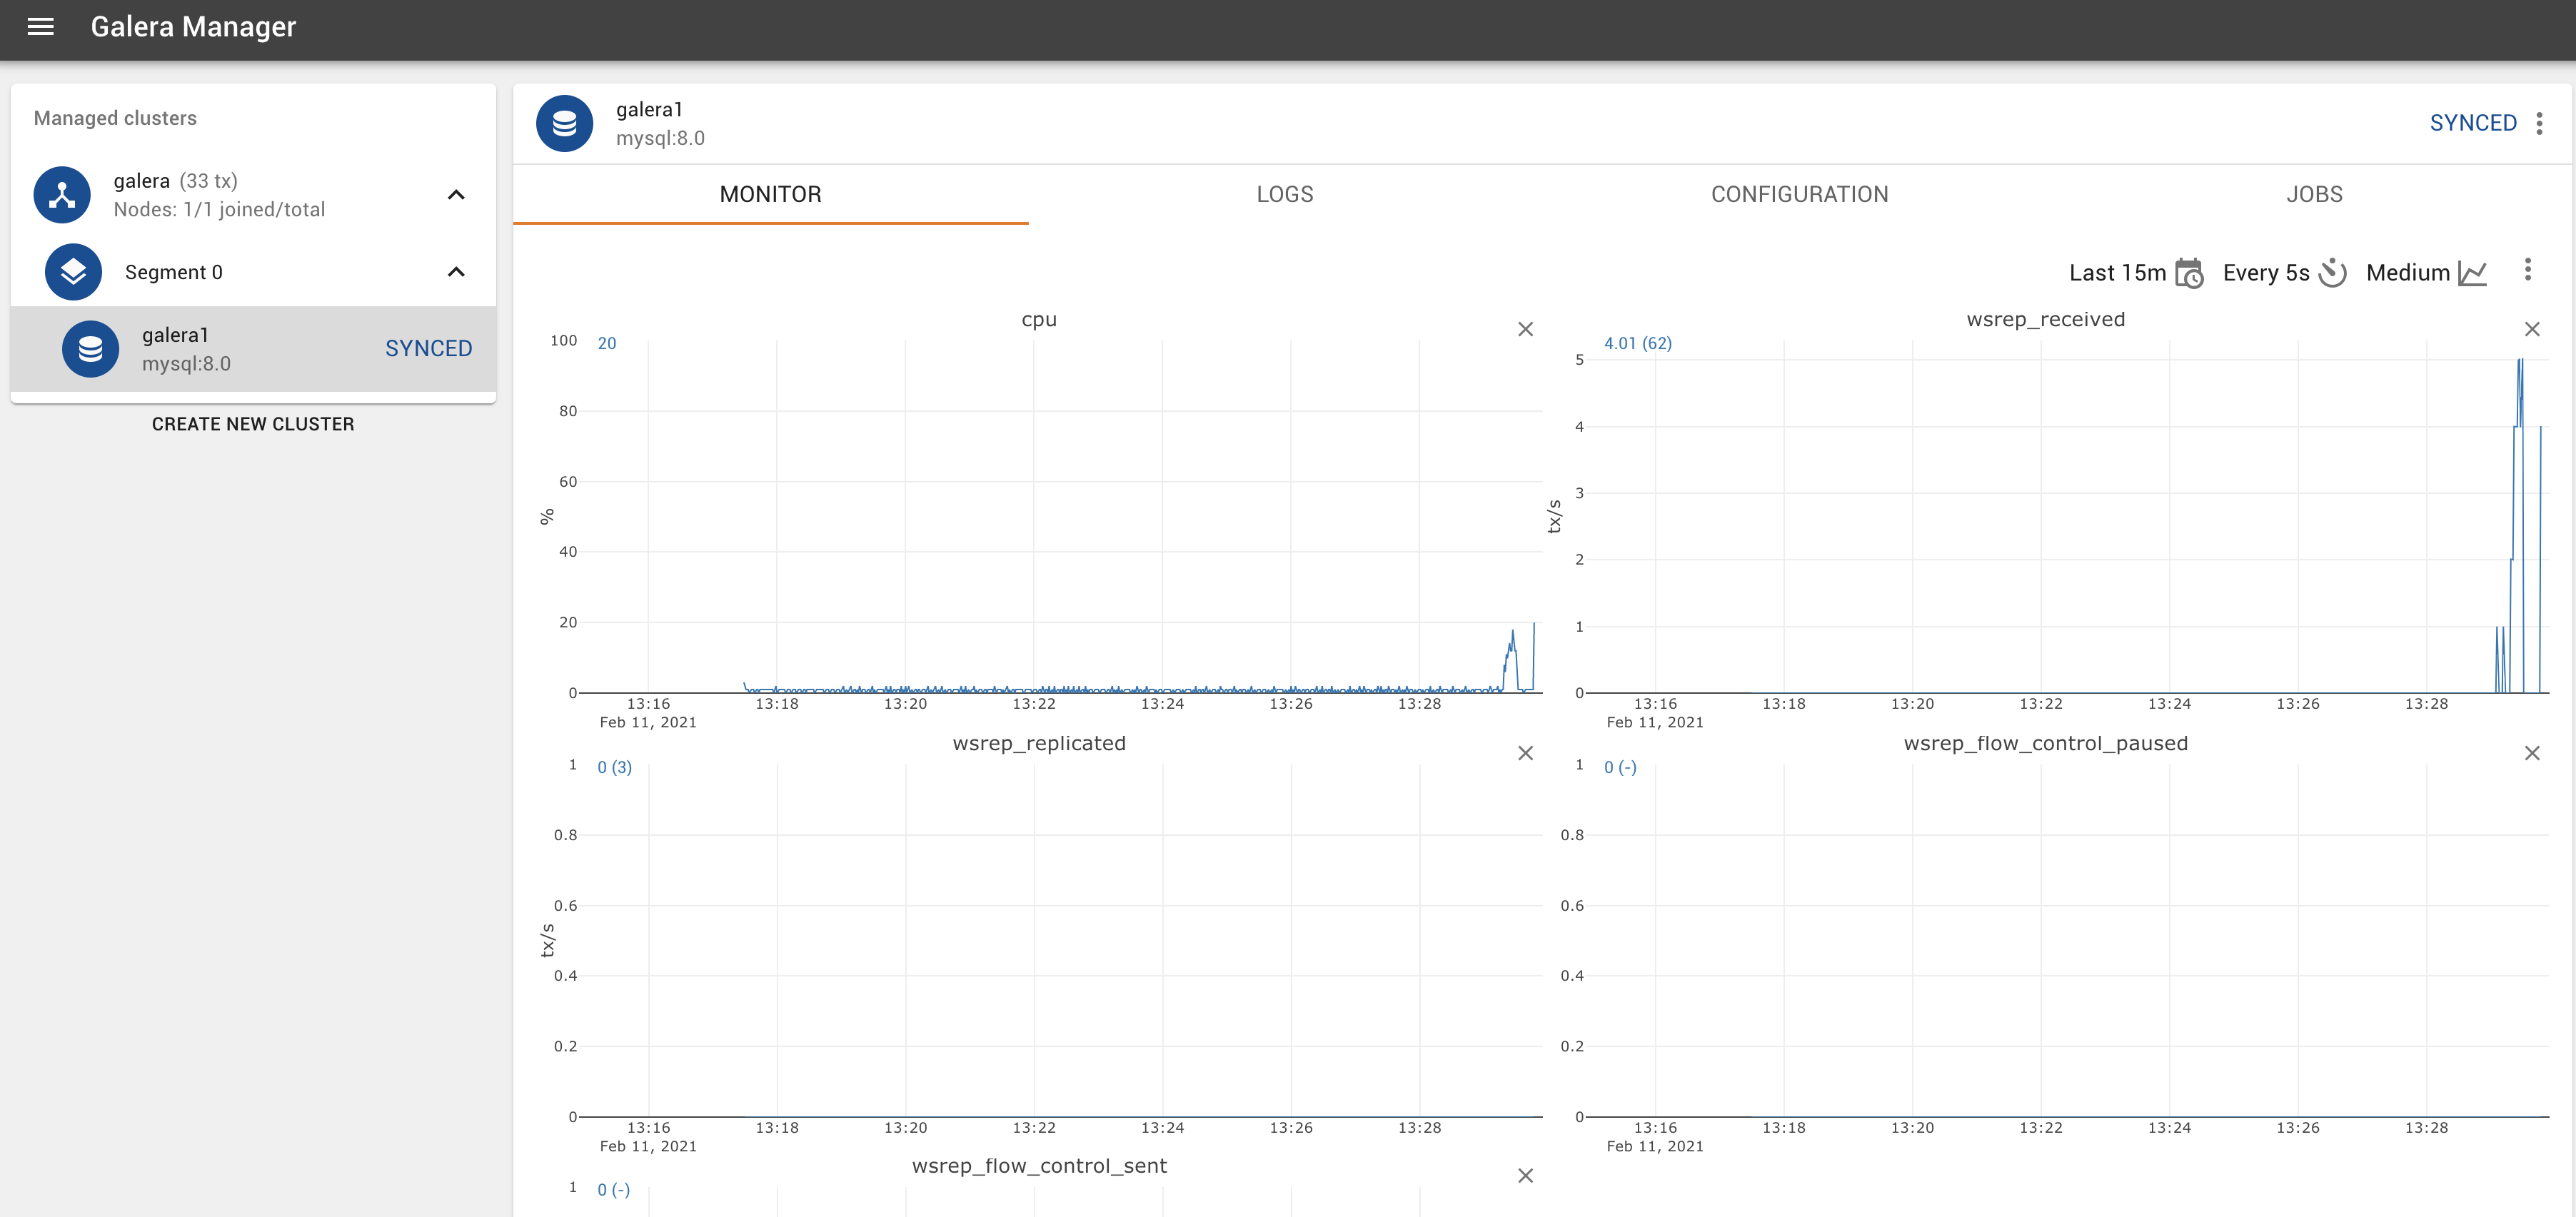
You’ll notice that when we start inserting data into node 1, wsrep_replicated starts having some activity that you can monitor.
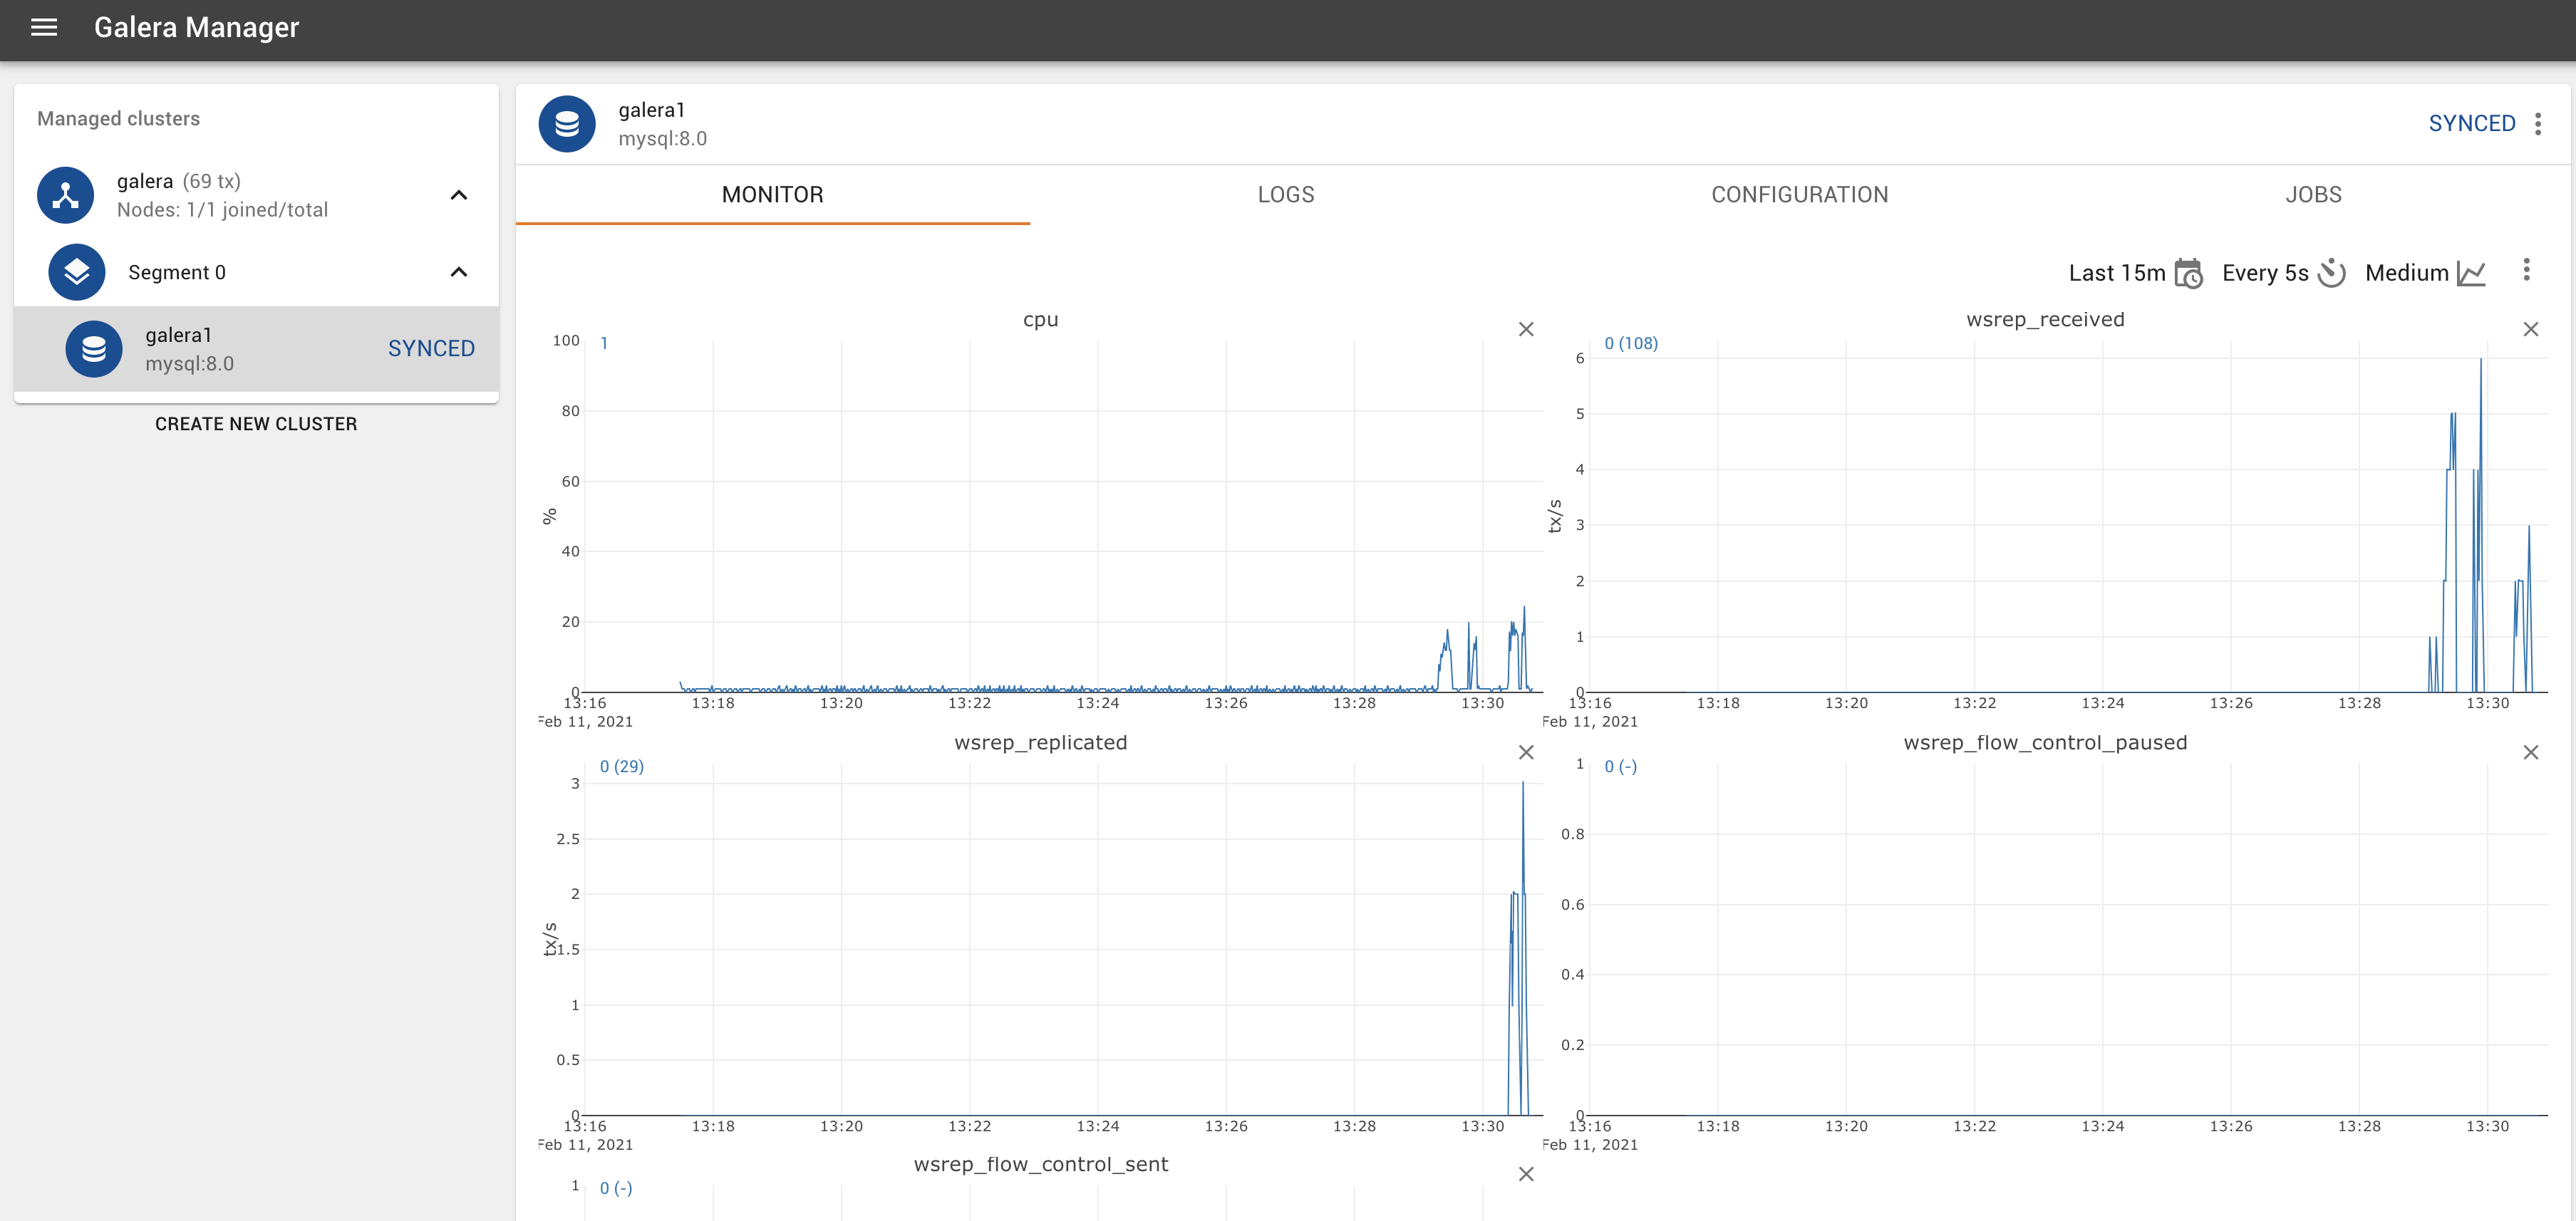
We then proceed to add nodes 2 and 3 to the monitoring.
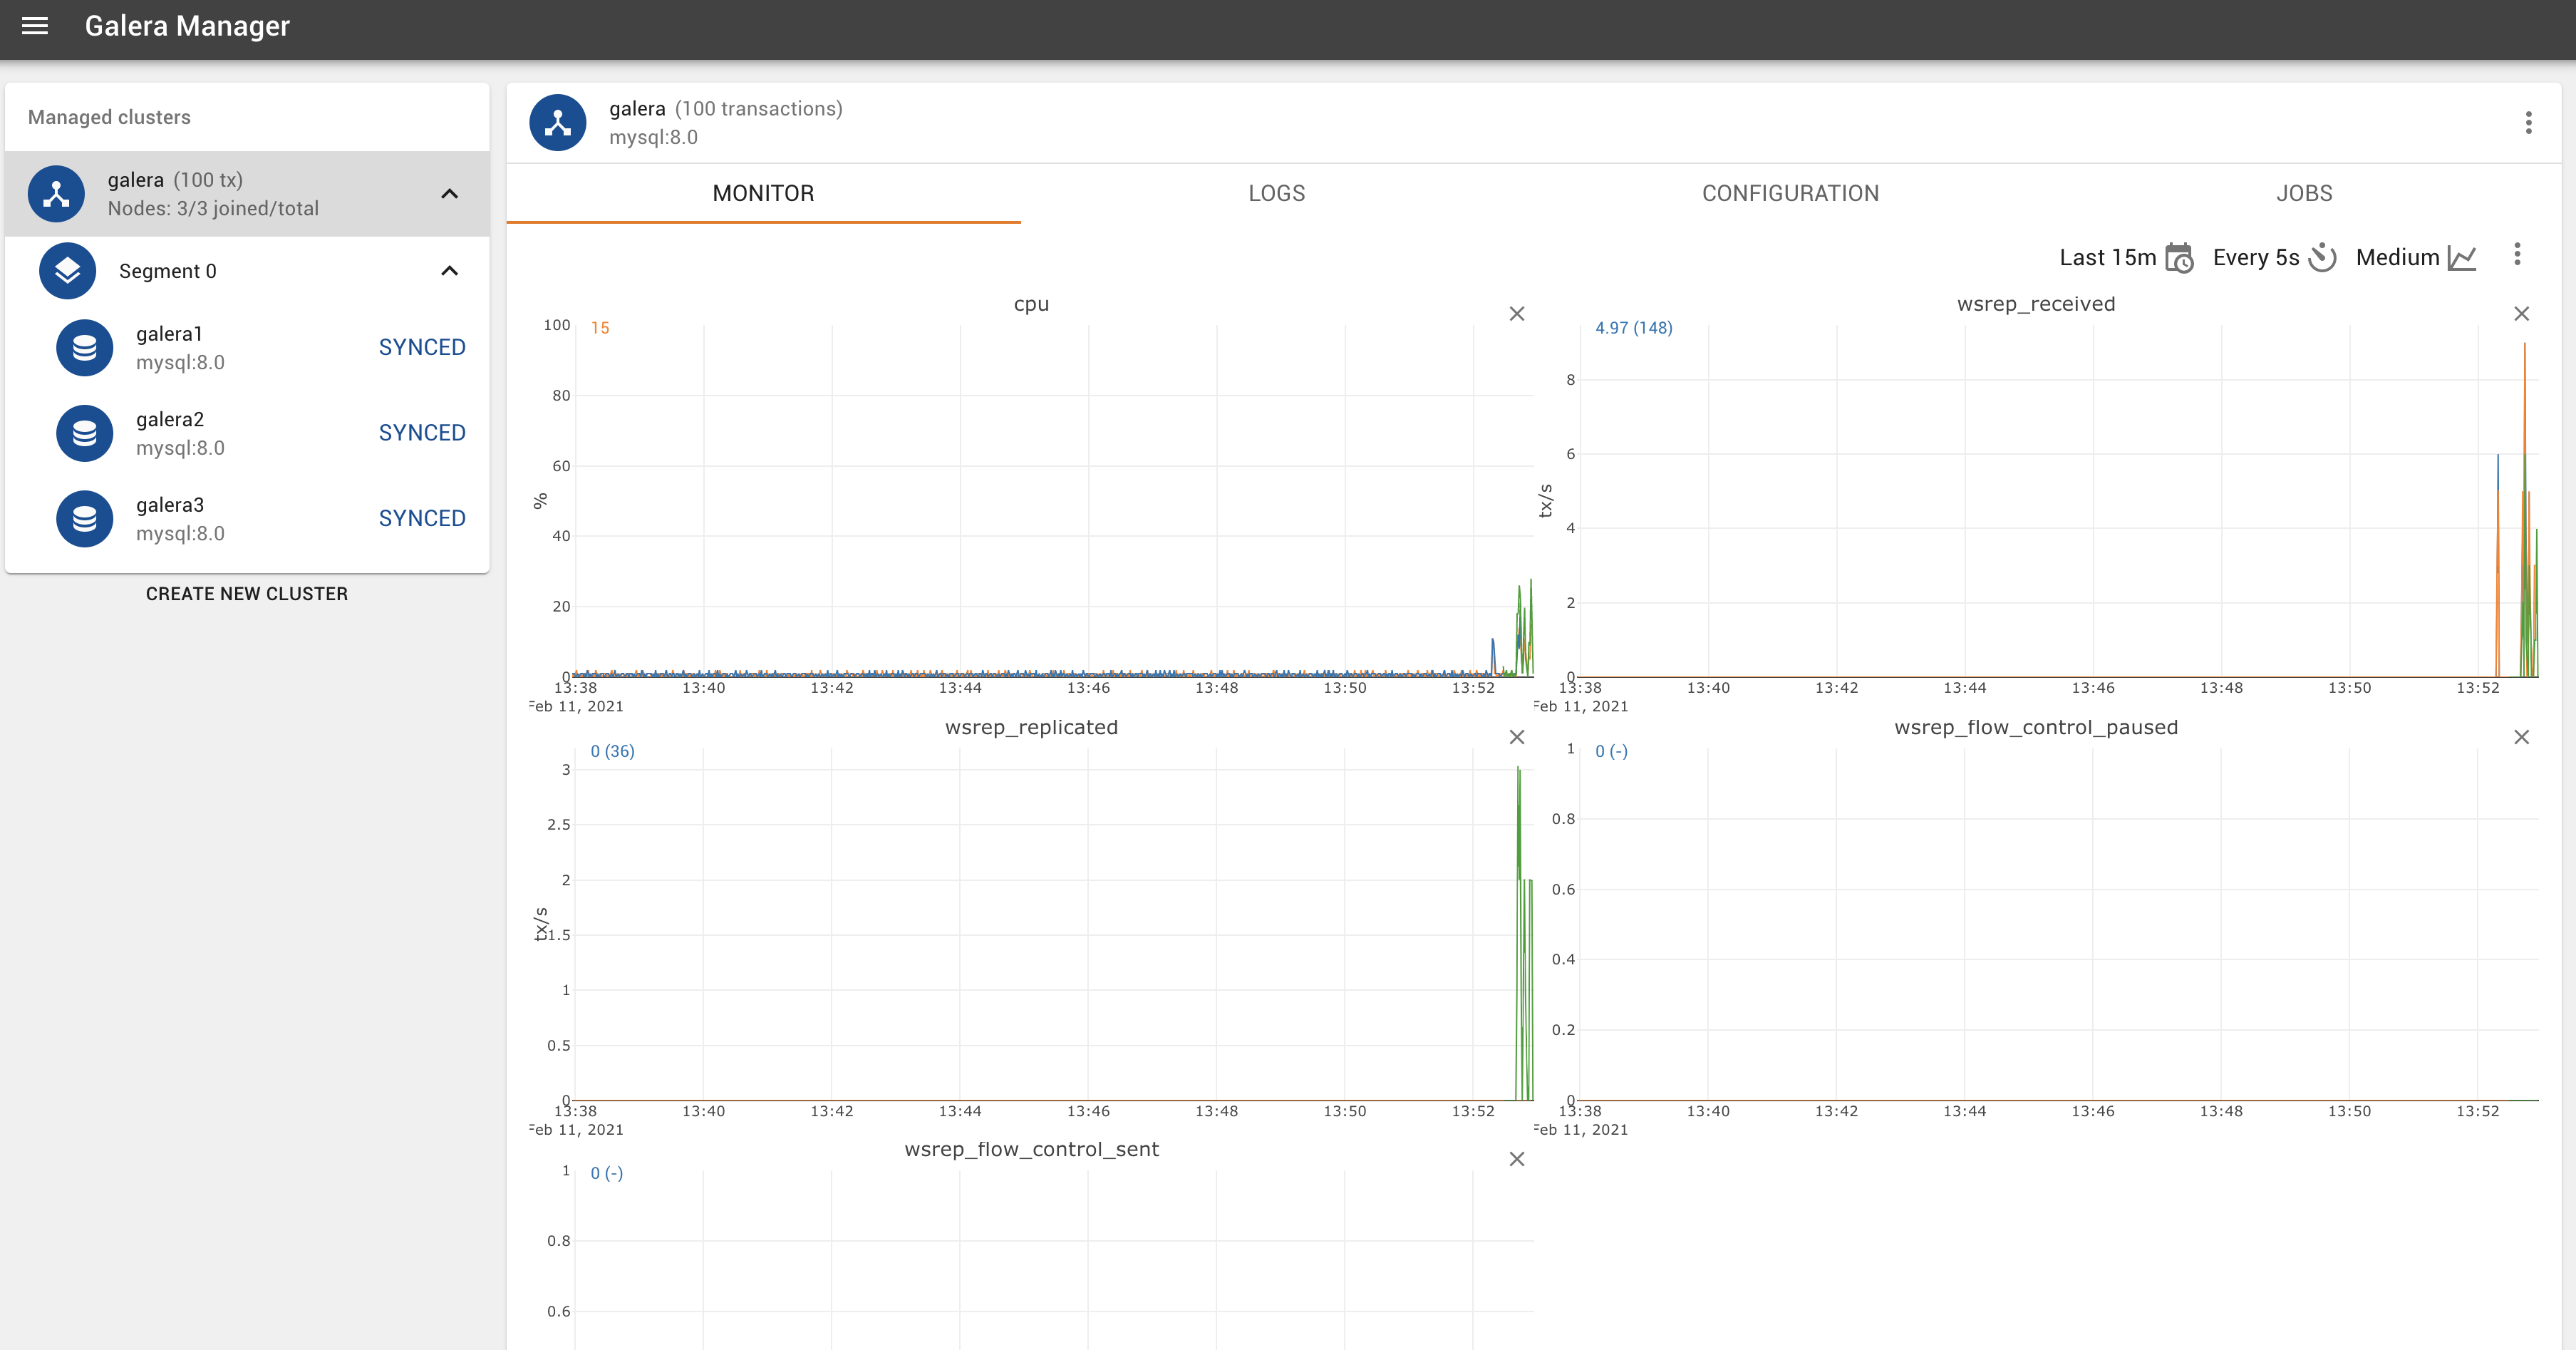
You’ll now notice that we can monitor the cluster as whole.
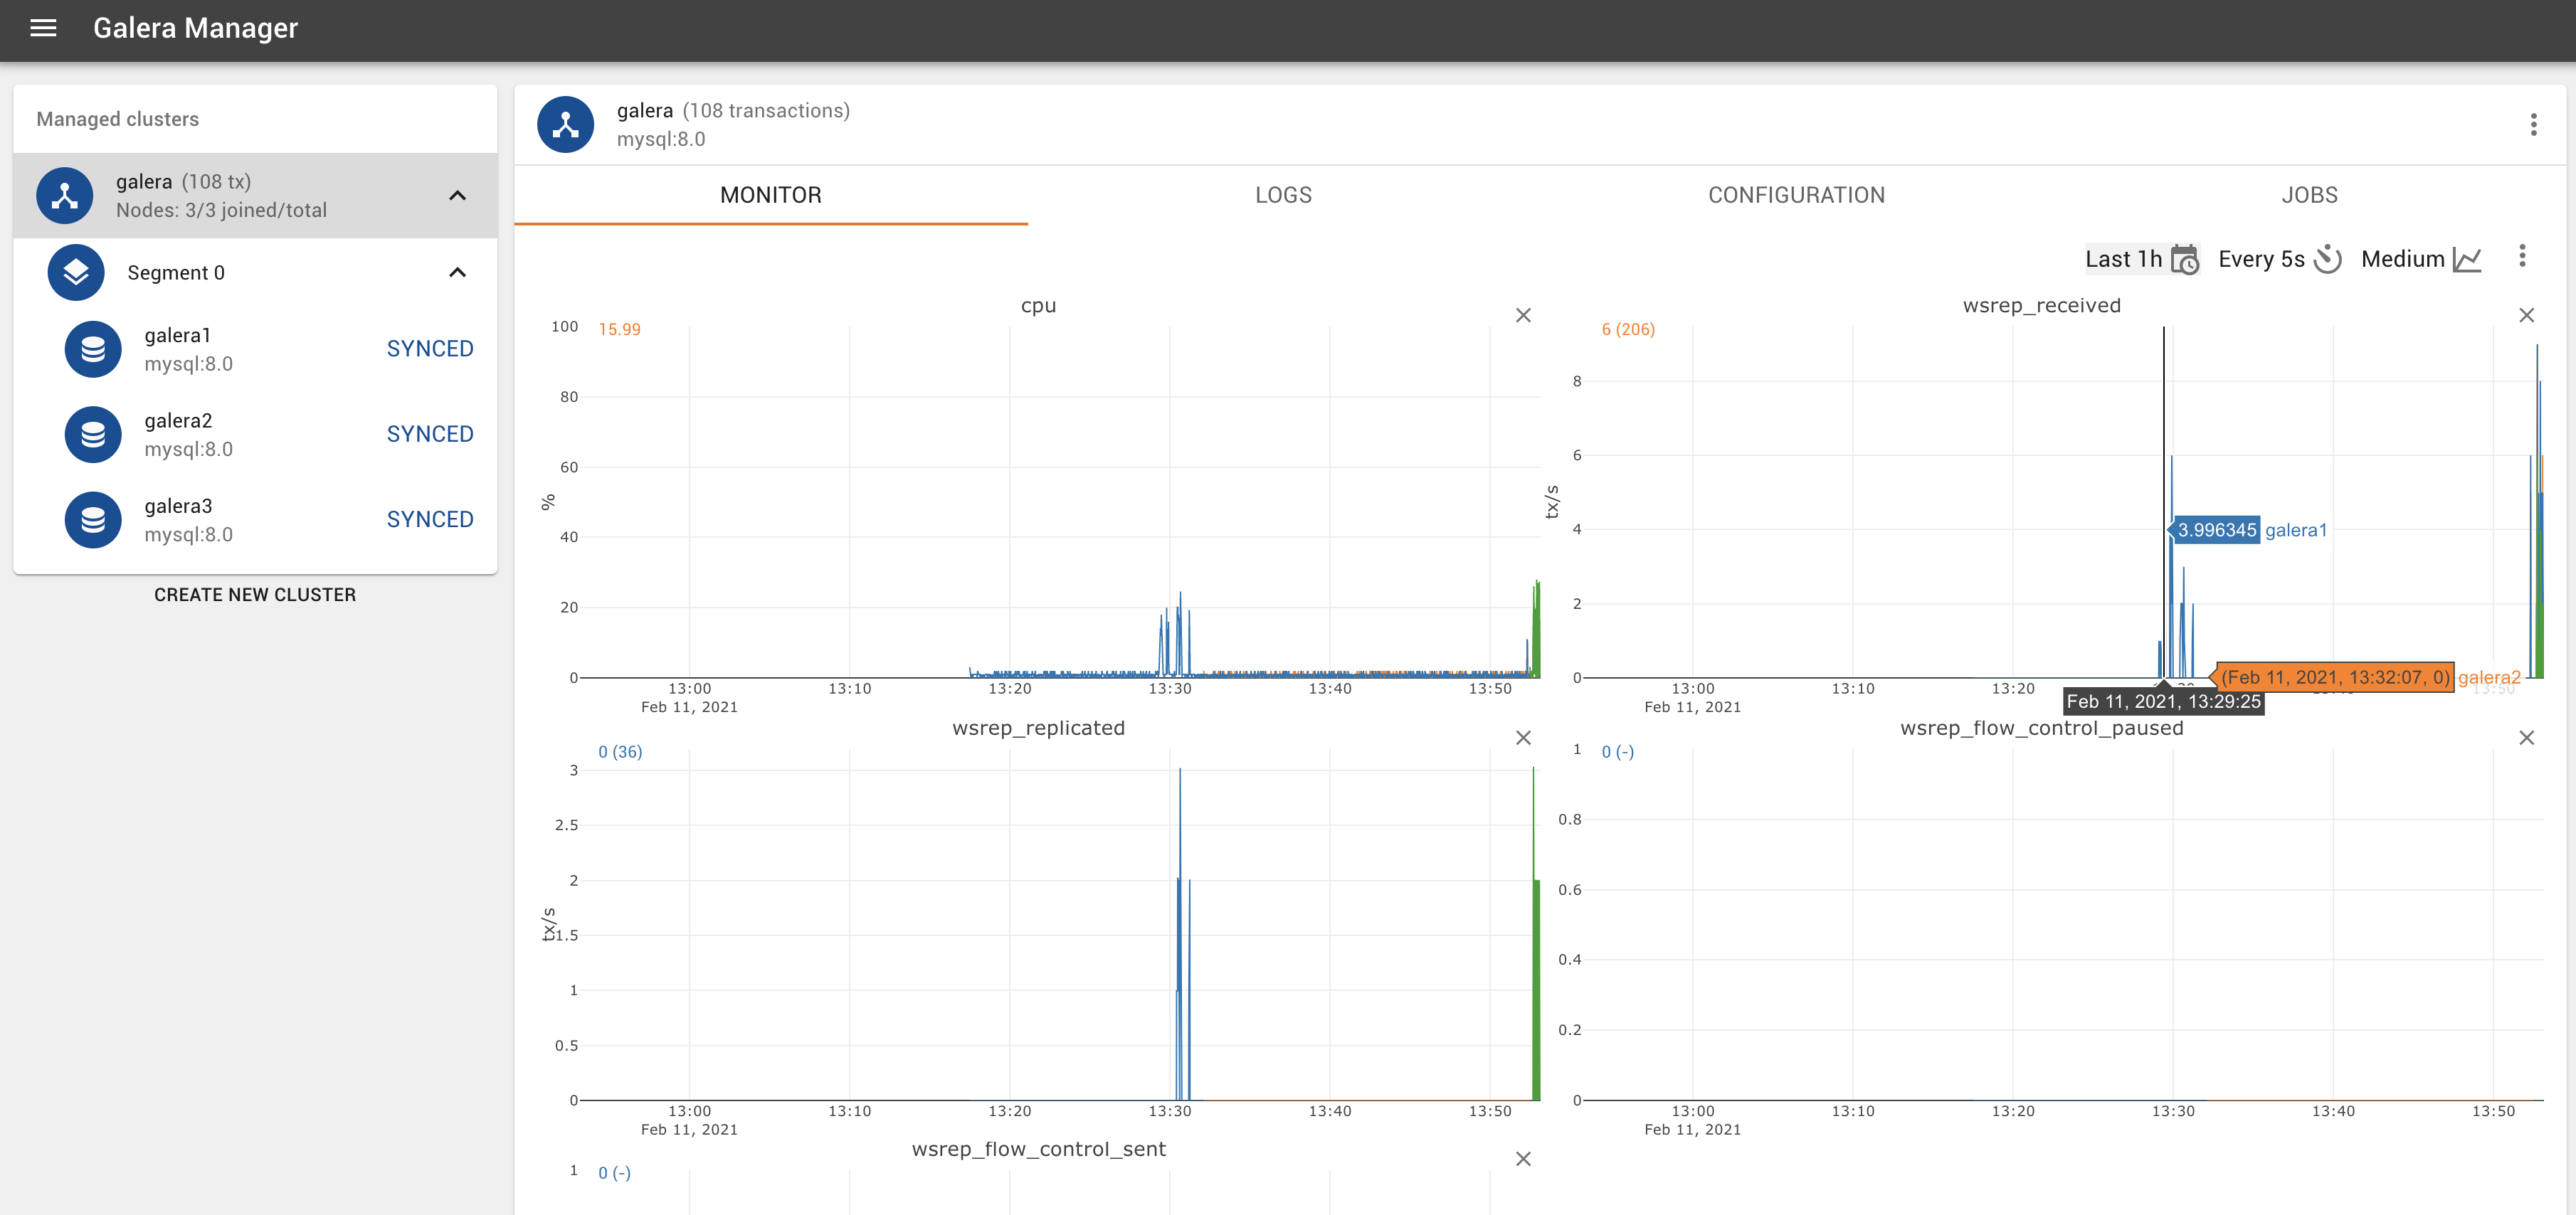
Galera Manager allows you to point out which node is having activity (as evidenced by the wsrep_received above).
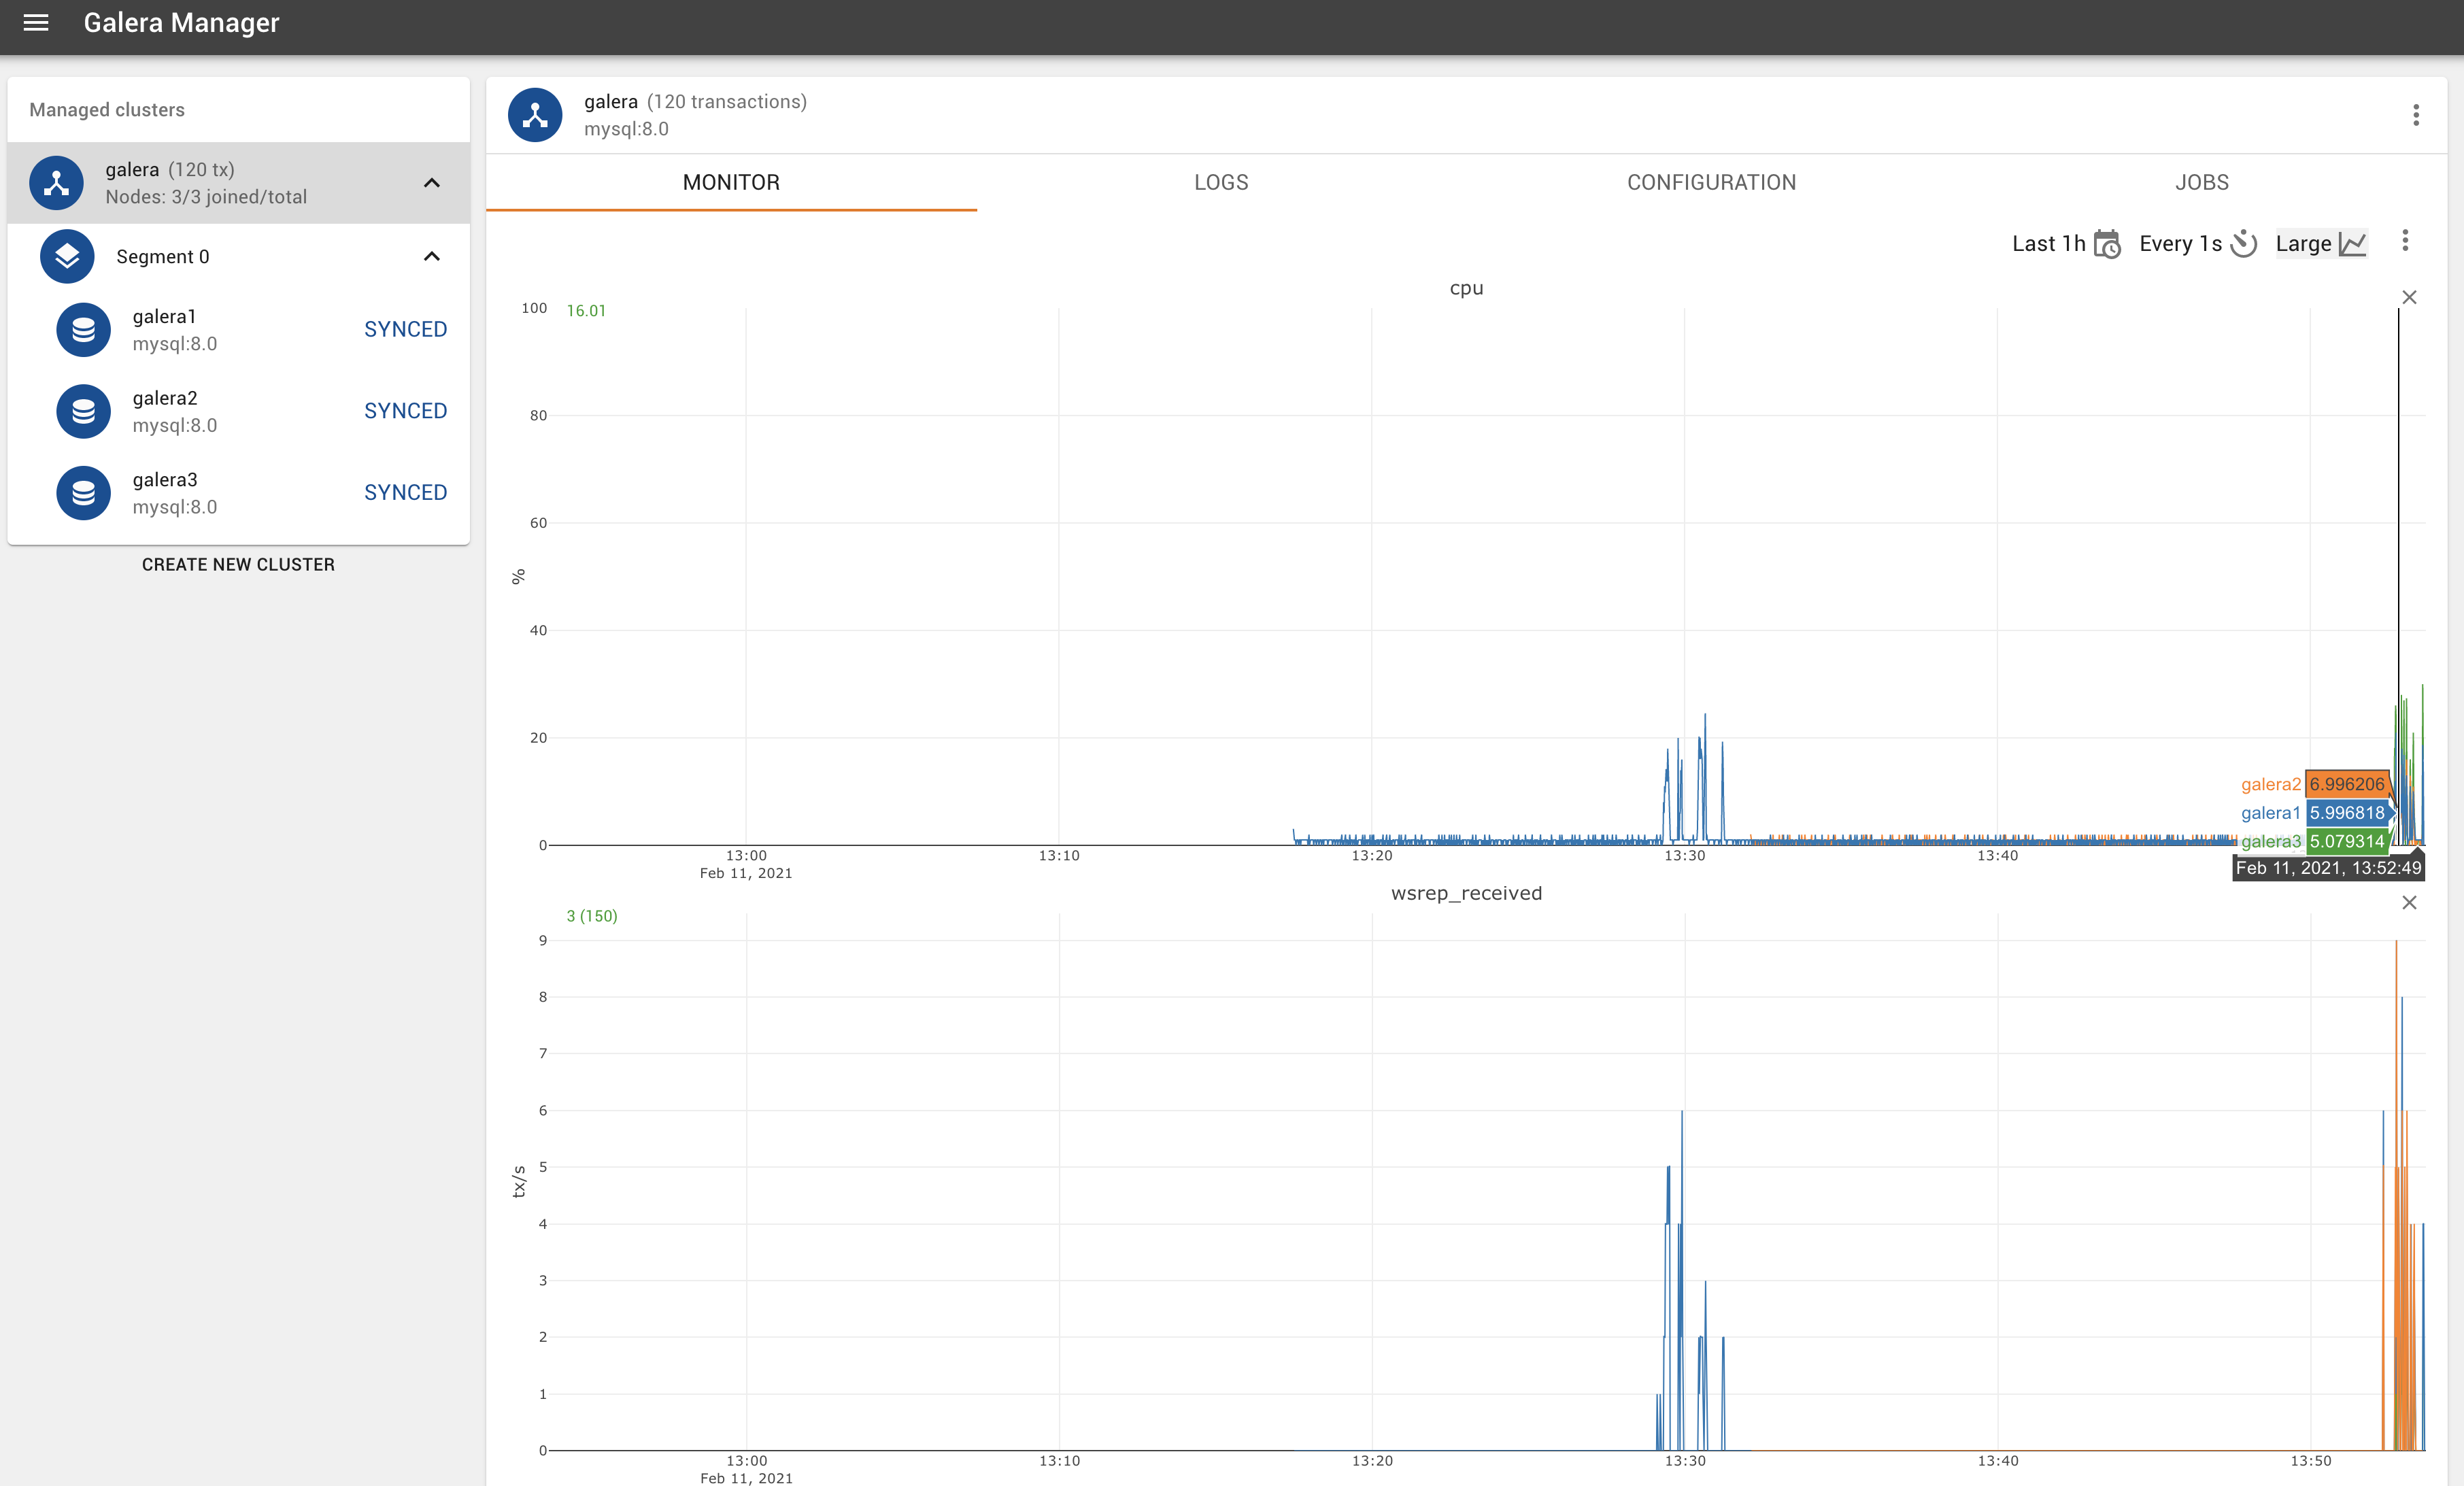
We can also go more granular, to see data in the last 1 hour, updated every 1 second, and go large (so you can see where the cpu usage and wsrep_received on a per node basis).

The above shows the wsrep_received on a per node basis.
So in addition to working on Amazon EC2, we now also do monitoring for unmanaged, pre-installed existing clusters that work on your local network or even your own cloud setups.
Please try the new Galera Manager software and give us your feedback. Don’t forget to join us for our webinar too!