Deploying a Cluster in Galera Manager
With Galera Manager installed, you are ready to create a Galera Cluster or start monitoring an existing cluster. This page of the Codership documentation describes how to connect to Galera Manager, create a cluster and how to add nodes to a cluster. If you haven’t already installed Galera Manager, go to the Installing Galera Manager documentation page to do that first.
Without Galera Manager, to create a Galera Cluster, you have to set up multiple servers or AWS Instances, and then install MySQL or MariaDB and Galera software on each. You also have to configure each server or node. It is a fairly detailed process. Instead, you can use the Galera Manager to make the process of creating a cluster and adding nodes simple and quick.
Create a Cluster
To create a cluster in Galera Manager, click on Create New Cluster. You’ll then see a large dialog box like the one below in Figure 1. In this box you will give the cluster a name, as well as make some default choices for creating nodes and hosts
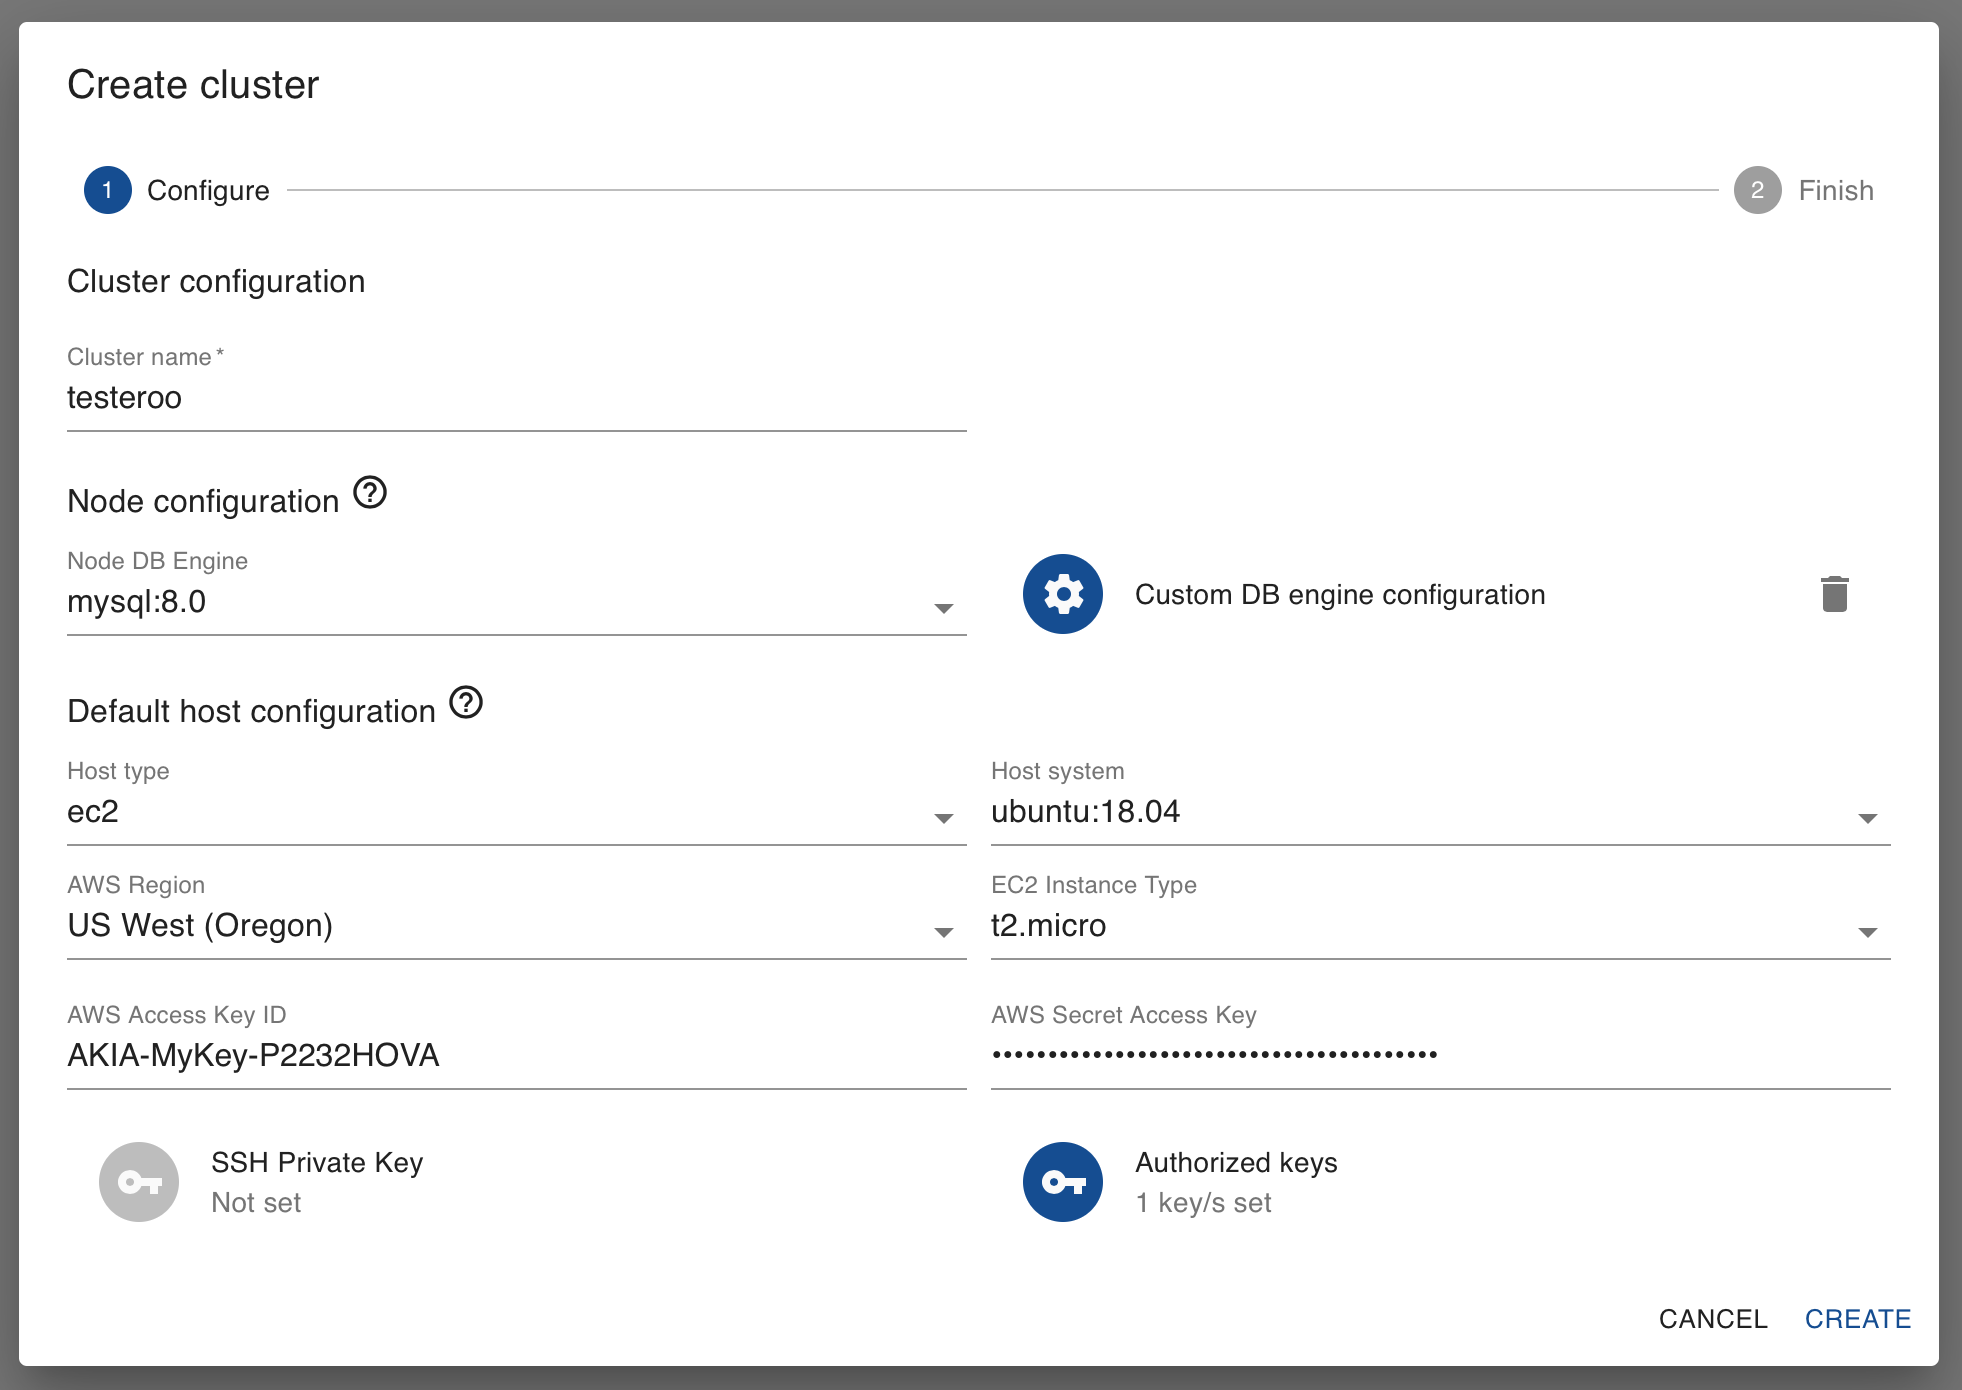
Create Cluster Dialog Box (Figure 1)
Looking at the screenshot here, in the first section labeled Cluster Configuration, you can see that you have to provide a name for your cluster. In this example, the name testeroo was given, but you should enter something more meaningful to your organization or system—especially if you will be creating more than one cluster.
Default Node Configuration
In the next section of the box shown in Figure 1, the section labeled Node Configuration, you are asked to make default choices that will be used when you later add nodes to the cluster. To be clear as to what’s discussed, below is the screenshot from Figure 1, but cropped around the default node configuration section:

Host Defaults Section of Create Cluster Dialog Box (Figure 2)
The first field in this section asks you to specify which version of MySQL or MariaDB you want to use. It is not a default but a final choice, because the nodes should all use the same version of the same database system. You shouldn’t have one node in a cluster using MySQL and another MariaDB, or even have them all using MySQL, but different versions. If you create another cluster, however, it may use a different database system and version.
Database Engine Configuration
Next, to the right in Figure 2, you may provide default custom configuration for your nodes, for example innodb_buffer_pool_size or wsrep_provider_options. This should be given in the same format you’d use in my.cnf. You would click on the icon of a cogwheel, where is says Custom DB Engine Configuration, to add those options or variable names with the values you want. Galera Manager manages configuration pertaining to its functionality (for example wsrep_cluster_address), so those variables managed by Galera Manager will be overridden.
In Example 1 below is the contents of /etc/mysql/mysql.conf.d/mysqld.cnf on one of the nodes which is running Ubuntu—it is the same for each node:
[mysqld]
pid-file     = /var/run/mysqld/mysqld.pid
socket = /var/run/mysqld/mysqld.sock
datadir = /var/lib/mysql
log-error = /var/log/mysql/error.log
These are minimal settings for MySQL. For Galera Cluster, there is an additional configuration file. These are the settings in /etc/mysql/wsrep/conf.d/99.galera.cnf, for the same node running Ubuntu:
[mysqld]
bind-address = 0.0.0.0
wsrep_on = ON
# make it dynamic according to the distribution
wsrep_provider = /usr/lib/galera/libgalera_smm.so
wsrep_cluster_address = 'gcomm://52.25.88.43,54.213.111.232,35.163.3.151'
wsrep_cluster_name = 'testeroo'
wsrep_node_name = 'noder-jfebk'
wsrep_sst_method = rsync
binlog_format = row
default_storage_engine = InnoDB
innodb_autoinc_lock_mode = 2
log_error = /var/log/mysql/error.log
general_log_file = /var/log//mysql/general.log
general_log = 1
slow_query_log_file = /var/log/mysql/mysql-slow.log
slow_query_log = 1
Although these excerpts were taken from Ubuntu nodes, the same settings will be found in nodes using other Linux distributions generated by Galera Manager. Notice that two lines were set for this particular cluster: wsrep_cluster_address contains all of the IP addresses of the nodes; and wsrep_cluster_name contains the name of the cluster. There’s one line that is set for this particular node: wsrep_node_name contains the node’s name. These adjustments are made by Galera Manager when adding nodes.
Again, if you want to add some other settings, perhaps setting values for InnoDB buffers, you add them to the box for Custom DB Engine Configuration. Below in Figure 3 is a screenshot of that box and how you might enter values:
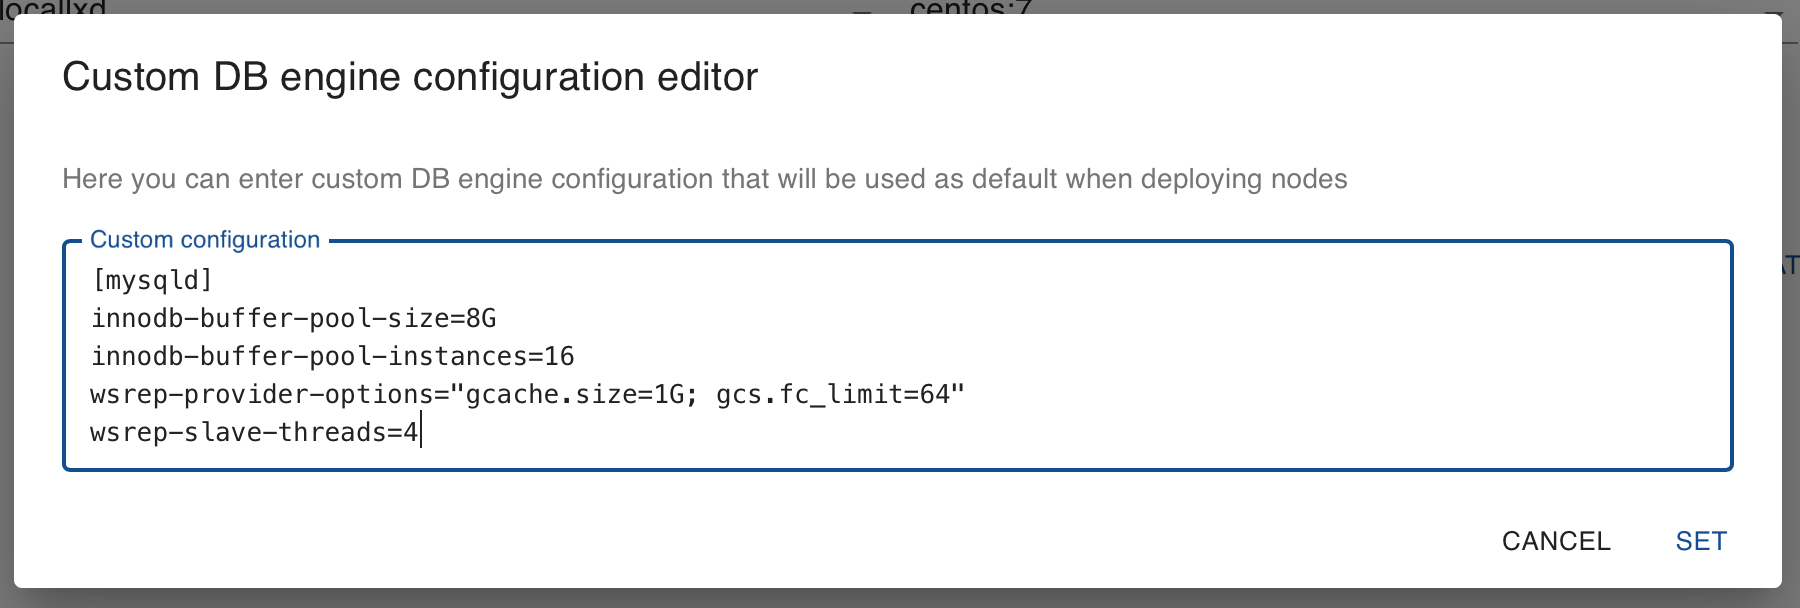
Node Default Database Custom Configuration (Figure 3)
Notice that you have to include the [mysqld] heading. When you are finished, click on Set to save. At this time, you won’t be able to make changes to these settings once you finish creating the cluster. So be sure you have everything you want before clicking Create. Otherwise, you will have to log into each node to make changes manually to the configuration files and restart the nodes. However, when adding a new node to the cluster you will be able to provide an alternative configuration. In a future release, you will be able to edit these default settings from within Galera Manager.
Default Host Configuration
The next section of the Create Cluster dialog box relates to how you want to create hosts, the servers on which nodes will be running. This has to do primarily with the operating system to install on the servers and how you will access those servers using ssh.
To make it easier to discuss, below is the screenshot from Figure 1, but this time cropped around the default host configuration section:
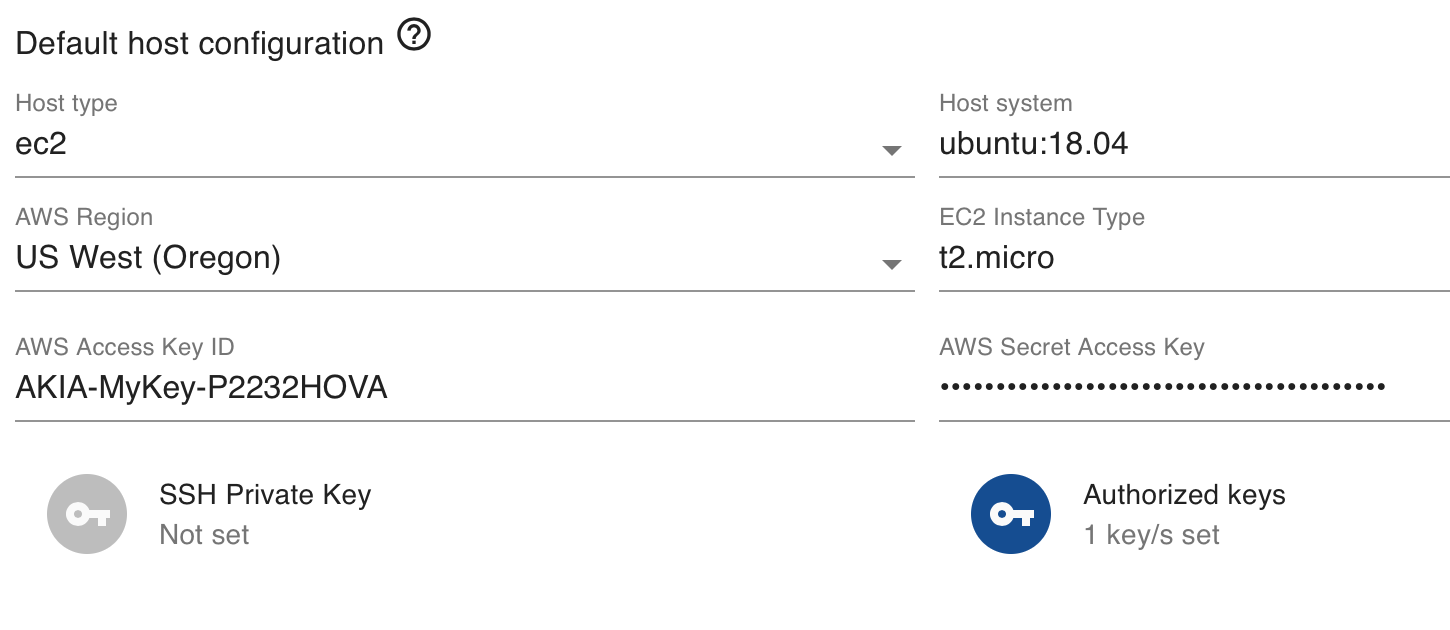
Host Defaults Section of Create Cluster Dialog Box (Figure 4)
The first field allows you to chose the host type: locallxd, ec2 or unmanaged. Choosing locallxd will instruct Galera Manager to generate Linux Containers, using the lxd daemon, to create hosts when you add nodes later. They’ll all run on the same server where you have Galera Manager. This option is primarily for testing purposes and shouldn’t generally be used.
Choosing ec2 will use Amazon’s EC2 service to create separate AWS Instances for each host needed for each node you add to the cluster. When you choose this, there will be fields allowing you to choose which AWS region to use for hosts, and which type of Instance—these relate to the size and speed of the server.
Choosing unmanaged will mean that you already have a manually managed running cluster. In that case Galera Manager will attempt only to install and configure monitoring software on the nodes and will perform only cluster monitoring but not management.
In a future release, Galera Manager will add more host types an support more cloud providers.
AWS Access Keys
In case you chose ec2 host type, you will also be asked to provide your Access Key information so that Galera Manager may interface with AWS on your behalf. This information is secure and not shared with Codership: it is confined to your installation of Galera Manager. Even if you already have a copy of the ID and the password, you may want create another key for use only by Galera Manager. You would do this on AWS’s site. To get to this page, log into the EC2 console. Then click where the name for your account is show. A pull-down menu will appear, as you see in the screenshot below:
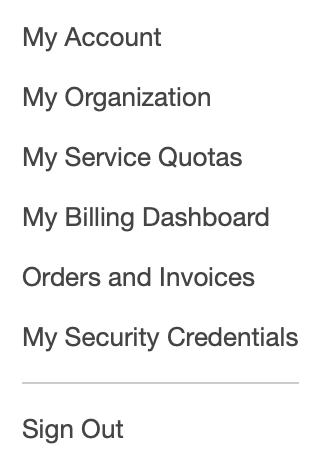
AWS Account Menu (Figure 5)
Click where it says, My Security Credentials. This will take you to the Identity and Access Management (IAM) page. Look in the main panel for the choice labeled, Access Keys and click on it to expand that sub-section. Your screen will look something like the screenshot below:
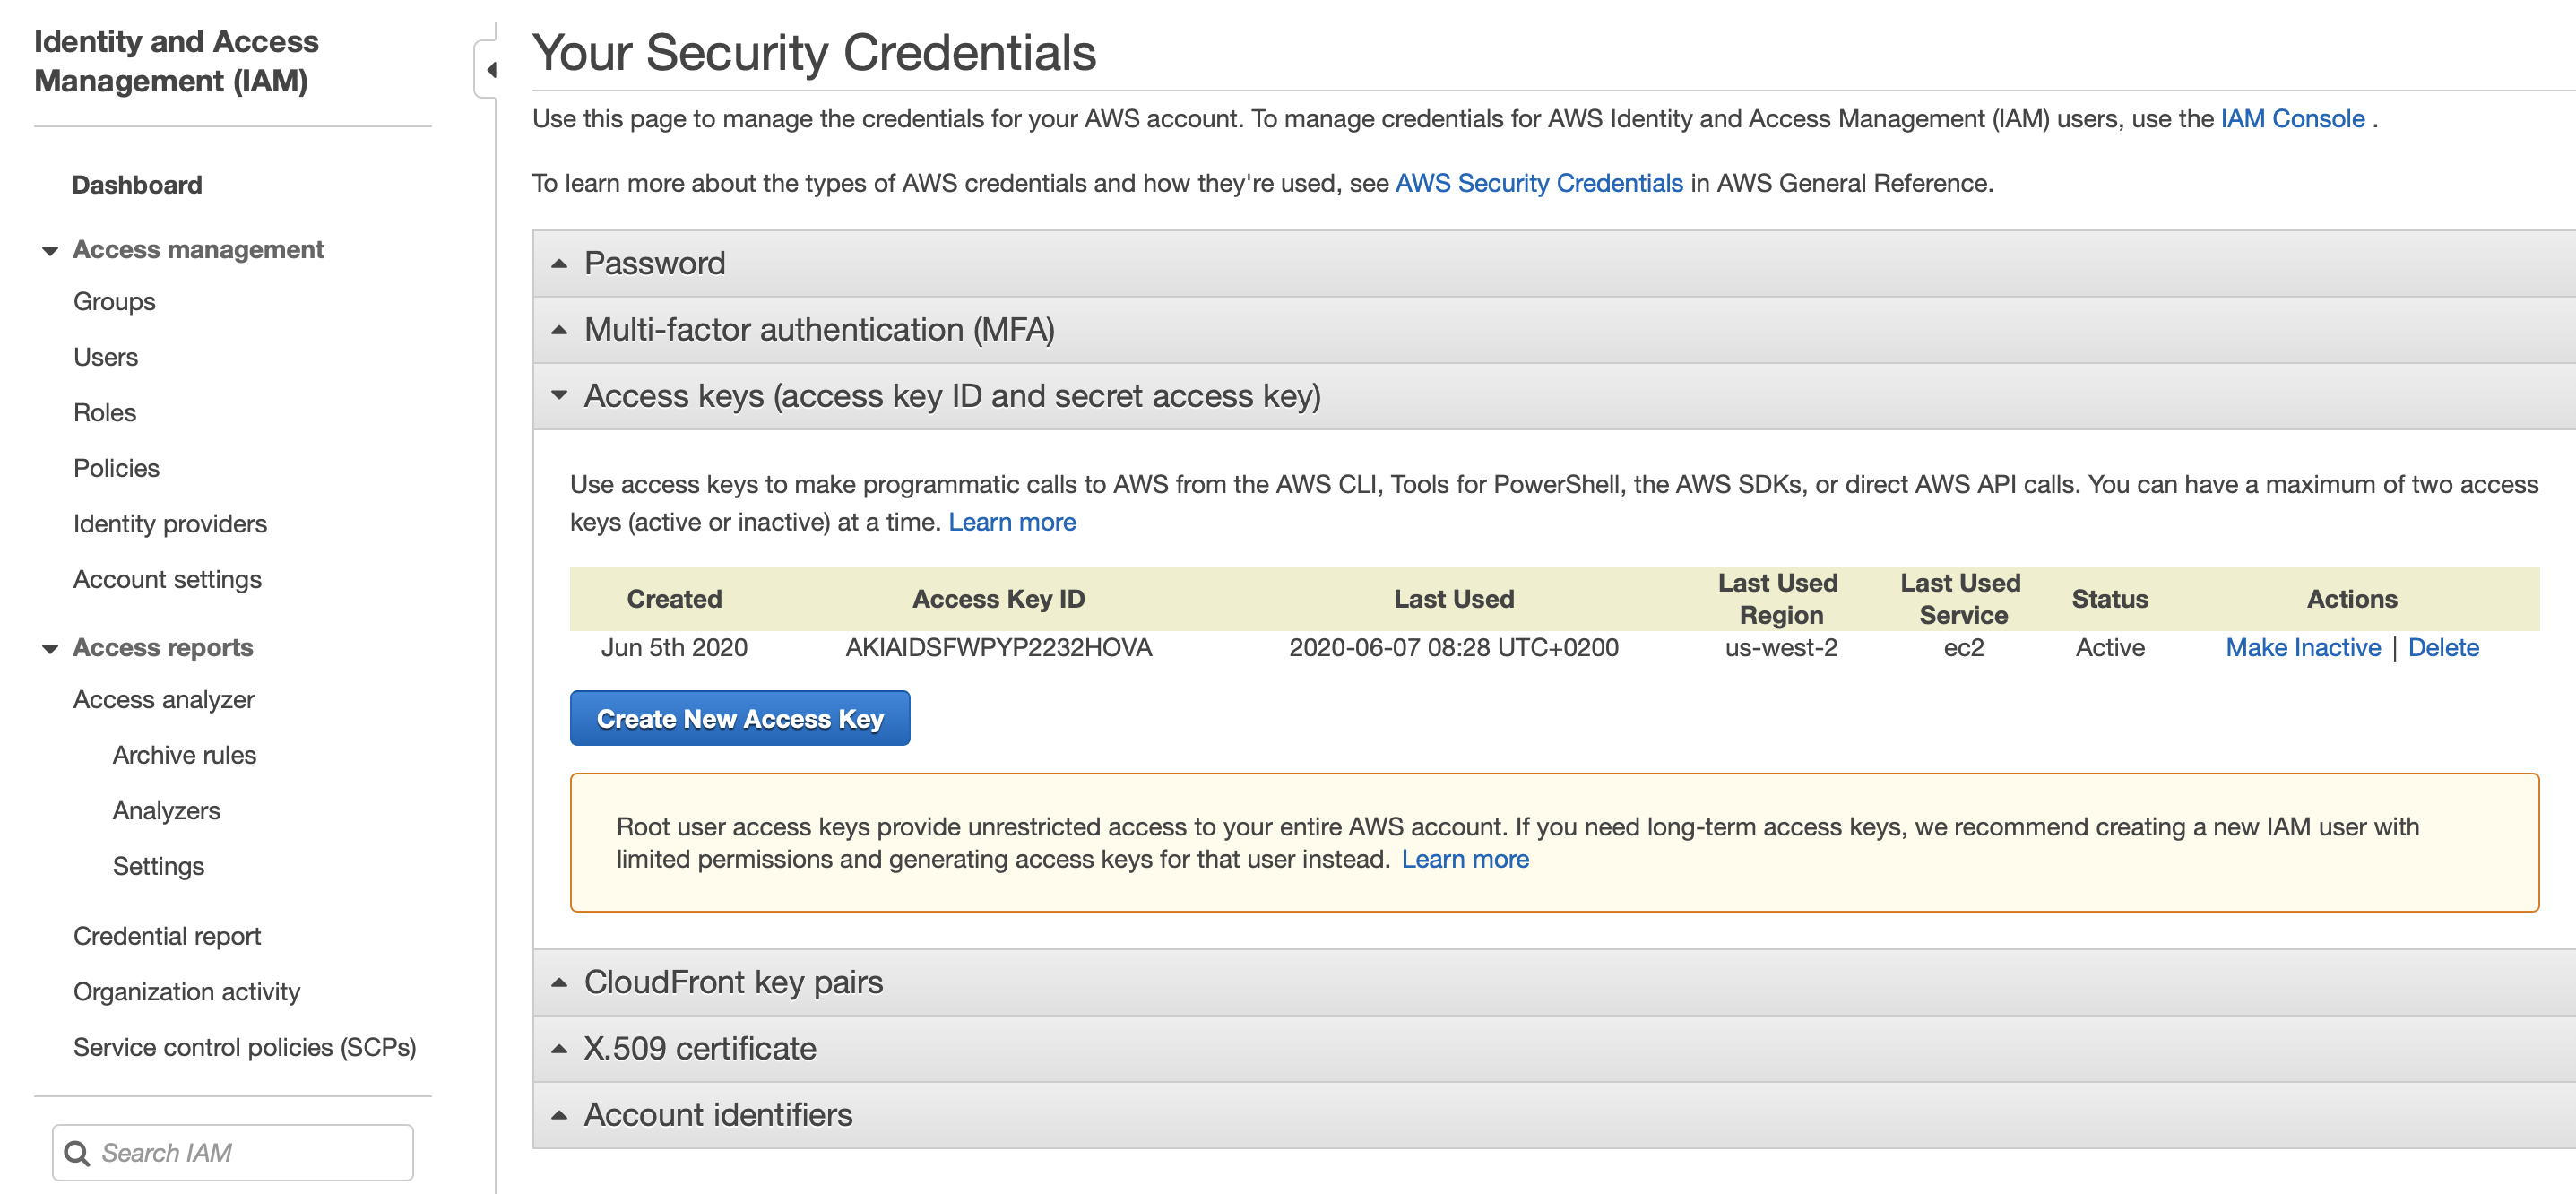
AWS Security Credentials (Figure 6)
Then just click on the blue button labeled, Create New Access Key. It will immediately create a new AWS Access Key ID and AWS Access Key. You’ll see a box appear like the one in the screenshot below:
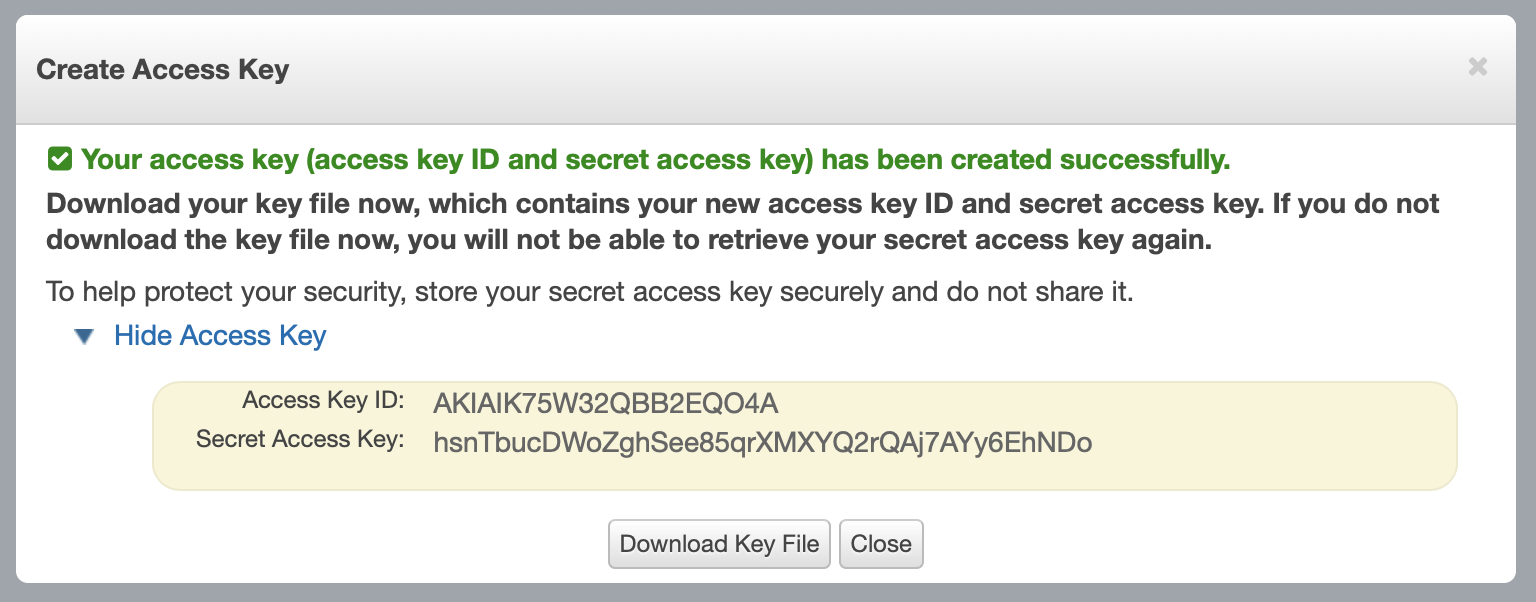
Created AWS Access Key (Figure 7)
You can copy the text containing the AWS Access Key ID and the AWS Access Key (see Figure 7), and paste each of them into the appropriate fields in Galera Manager where you are in the process of creating a cluster, in the Default Host Configuration section. You may also want to click on the gray button that reads, Download Key File to download the AWS Access Key. This will download a CSV file containing the same information. Make a copy or download the key immediately and save it to a secure location since you won’t be able to access this key on AWS or in Galera Manager once you close this box.
SSH Keys
The last two fields of the Default Host Configuration section are related to ssh enryption keys. To be clear, below is the screenshot from Figure 1 again, but cropped here around the part on SSH keys:

SSH Keys for Default Host Configuration (Figure 8)
These encryption keys are used to access the hosts via SSH.
You should provide the private key in case you want Galera Manager to use a specific key to access the hosts, for example if you have set up corresponding public keys on the hosts. You need to supply the key if you have chosen unmanaged host type, otherwise it is not required: Galera Manager will generate its own key pair.
For you as administrator to access the host with ssh, you will need to provide one of your own public keys. Click on the icon of a key on the right, where it says, Authorized Keys. A box will appear like the one below in Figure 9 for you to paste in your public key from your own private key:
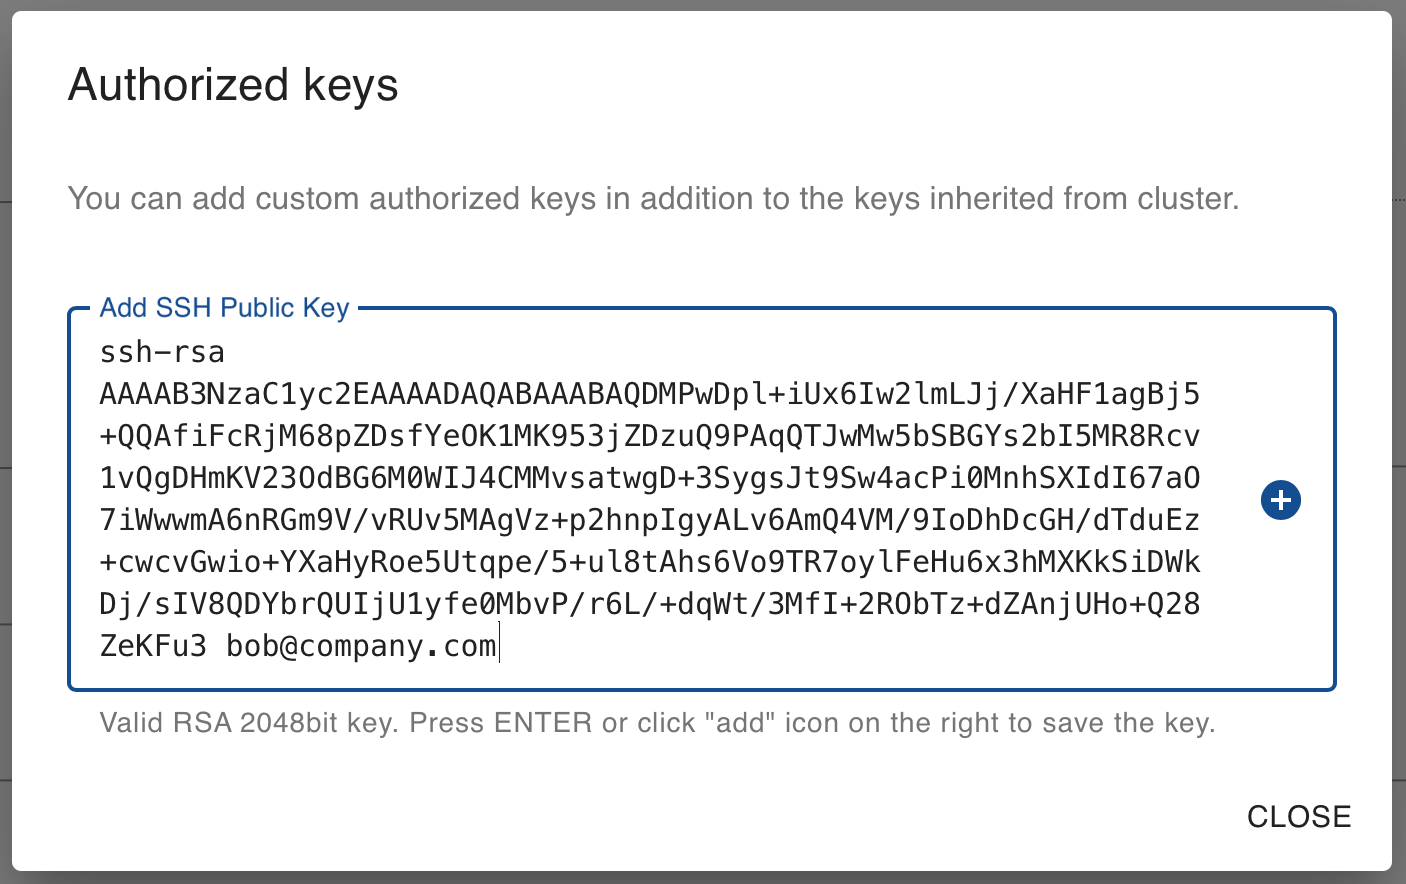
Add Authorized Public SSH Keys (Figure 9)
After pasting in the public key, click on the plus-sign icon to store it. The field will become empty again so that you may paste in another public key. You may want to paste in a public key for each person for whom you want to provide command-line superuser access to the hosts.

Authorized Public SSH Keys (Figure 10)
Finishing Deployment
When you finish with all of your settings for the new cluster, click on the text in blue where it reads, Create. This will open a small box that should say it was successful, like the one below:
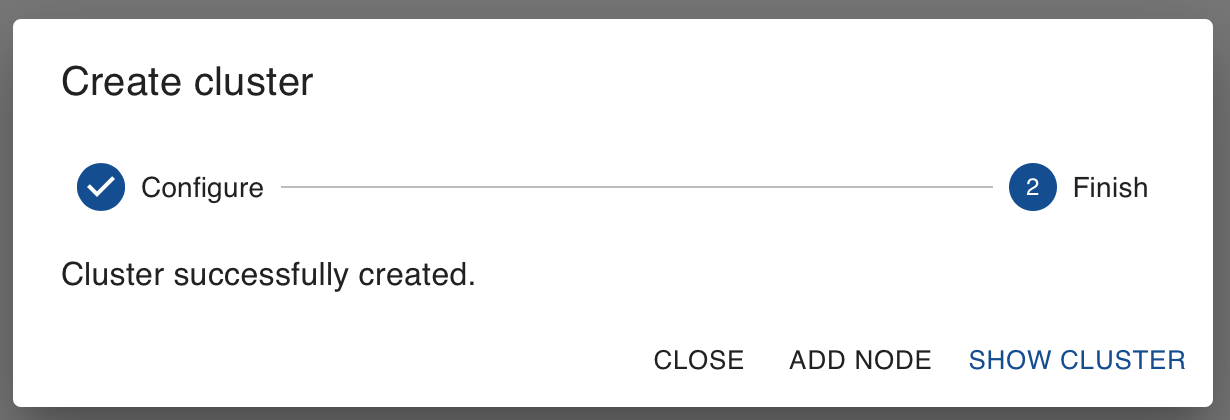
Cluster Finished Creating (Figure 11)
There’s not much to this because you haven’t yet added nodes to the cluster. To learn about how to add nodes to a cluster, read the Adding Nodes with Galera Manager documentation page. Check the Adding Users to Galera Manager page on adding users, the Loading Initial Data on adding data, and the Monitoring a Cluster with Galera Manager page on configuring the metrics to track.
Galera Manager Documents